CLEANING COYOTE LEGACY TIRE DEFLATORS
FOR COYOTE LEGACY DEFLATORS ONLY
THIS ARTICLE CONTAINS INFORMATION ABOUT COYOTE LEGACY DEFLATORS. LEGACY DEFLATORS HAVE DIFFERENT SPECIFICATIONS, ASSEMBLY AND MAINTENANCE INSTRUCTIONS FROM THE NEWER COYOTE VORTEX V2 DEFLATORS. IF YOU ARE UNSURE ABOUT WHICH COYOTE DEFLATOR YOU OWN, READ THIS ARTICLE BEFORE ATTEMPTING TO ADJUST OR MAINTAIN YOUR COYOTE DEFLATOR.
CAUTION: Low tire pressure makes for unfamiliar vehicle handling. Never deflate your tires unless you have a way to reinflate them to the pressure recommended by your vehicle or tire manufacture for highway use. Compressed air (any gas) presents hazards, so always use protective eyewear when setting or using your Coyote Automatic Tire Deflators.
Never completely remove the Adjustment Cap from the deflator Body while screwed on an inflated tire or pressurized vessel valve stem. This will shoot parts out of the Body and could lead to severe injury including blindness or death.
 Following are instructions on how to disassemble, clean and reassemble Coyote Automatic Tire Deflators. A brief 1, 2, 3 approach is offered first. Each STEP # links to more information. Clicking on the destination STEP # returns you to the step from where you came.
Contact us by phone (949) 645-7733 or email Harry@CoyoteEnts.com . We want you to be completely successful with cleaning and happy with your Coyotes. If you have a problem, tell us! If you’re happy, please tell others.
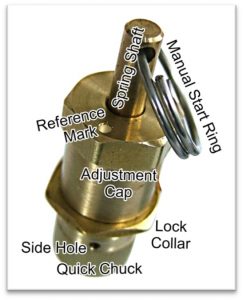
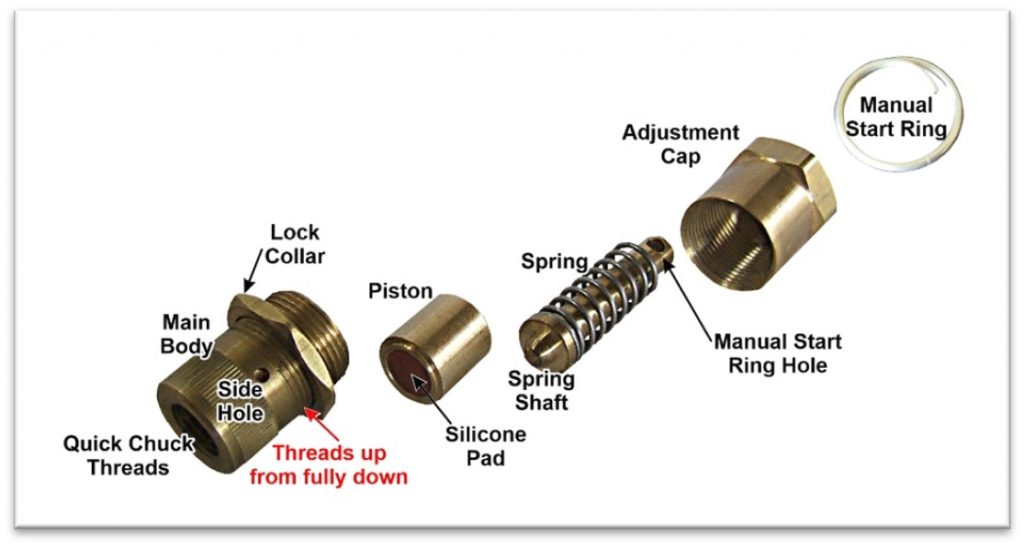
PARTS: This Coyote automatic tire deflator outside view shows the four brass parts, the stainless-steel Manual Start Ring and identifies features (Reference Mark, Side Hole and Quick Chuck).
The inside parts and assembly details are shown here.
STEP 2: Remove the Manual Start Ring from the Spring Shaft and set aside.
STEP 3: CAUTION! DO NOT remove the Adjustment Cap on a pressurized valve stem. Internal parts will shoot out of the deflator Body.Holding the deflator vertically, remove the Adjustment Cap and set aside.
STEP 4: While still vertical, remove the Spring Shaft and the Spring, and set them aside. This link covers changing springs.STEP 5: Turn the Body upside-down and shake the Piston out. Set it aside.
STEP 6: Inspect the Body and Piston for damage or debris. STEP 7: Clean all of the parts with water or rubbing (isopropyl) alcohol. Do not use other solvents. STEP 8: Dry all parts thoroughly. STEP 9: Assemble in reverse order referencing the above images. DO NOT LUBRICATE!: Virtually all lubricants collect dirt. Dirt interferes with proper operation.DETAILS
Cleaning and Changing Springs
DESTINATION PRESSURE:The pressure at which the deflator has been set to automatically shut OFF.STEP 1: Cleaning starts with a pre-disassembly step. Take note of the number of threads that the Lock Nut is up from fully down. If you are real particular like me, you’ll also note the Adjustment Cap Reference Mark’s position relative the Side Hole in conjunction with the threads up. Use this info-combo to reassemble your deflator and you’ll be very close to your previous destination pressure setting.
Be aware that the number of threads up, for deflators set to the same pressure, may vary from deflator to deflator. This is due to manufacturing processes and tolerances. This is normal.
Loosen the Adjustment Cap from the Lock Nut.
 STEP 2: Remove the Manual Start Ring from the Spring Shaft. The removal and reattach trick is to take advantage of the Ring’s “open end”. Use the open end to initiate both removal and replacement on the Spring Shaft. Set Ring aside.
Usually, there’s no need to separate the Ring from the Shaft from the Cap, so you may remove these as a subassembly, but first, a word of CAUTION!
If you choose, remove the above combo (Ring, Cap, Shaft and Spring) as a unit and jump to STEP 5, otherwise …
Holding the deflator vertically with the Spring Shaft up, loosen and remove the Adjustment Cap from the Body. Also remove the Lock Nut from the Body. Set these aside.
STEP 5: I’m right-handed, so adapt accordingly. Turn the Body upside-down over your left palm and the Piston should drop out. If not, a sharp shake or hand-to-hand tap will help. Set it aside. If you are disassembling a dysfunctional, like “stuck-ON” deflator, this may require more vigorous tapping. STEP 6: Inspect the Body for two things: Is the Body cylinder bore free of axial scratches? These usually accompany Piston scratches (following). They reinforce the importance of using valve caps. The balance of the Body (the bottom of the bore) is usually damage free. All flaws in this area would have shown up at factory test and set.
Now flip the Body over and inspect the valve stem-seating O-ring (no need to remove it). Give all of the 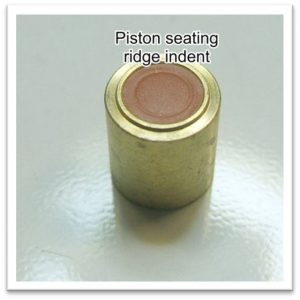 threads a quick glance, too. All should be flawless. Thread damage and O-ring abuse usually indicate that you may be applying too much tightening force during installation (not covered by the Warranty). Lighten up! Once you feel O-ring/valve stem contact; only turn it about an additional quarter turn more. With the deflator OFF, your ears (leaking air sound) will tell you if it needs more tightening. Experiment to determine proper tightening.
At the bottom of the Body bore is a seating ring (ridge). This leaves a normal indentation in the Piston pad as shown. There should be no reason to remove the pad. If needed, push the pad out of the nesting area using a blunt object (# 76 drill, shank side) through the 0.020” hole on the inside of the Piston being careful not to puncture the pad (not covered by the Warranty). The pad can be reinstalled in the Piston with either side up. If one side is worn (very unlikely), mount it against the Piston, leaving the better surface exposed. Preferred is to leave the indentation showing. Set the Body aside.
Inspect all Piston surfaces. The inside of the Piston should be free of rough surfaces. The outside should be free of axial scratches. Discoloration spots are normal.
Piston and Body scratch removal should be performed with 600 or less aggressive sandpaper and applied as “passively” as possible. Always use valve caps to avoid needing to perform this task due to the introduction of contaminating grit from valve stem into deflator. Set the Piston aside.
Regarding “passively”, the way to check if the Piston, Body-bore combo have had enough sanding is to put the clean Piston in the clean bore, cap off the Body end with a finger and see if you can freely shake it. If no, continue sanding gently until the Piston freely shakes and falls out.
A gentle shaking or stirring is usually sufficient.
Remember me saying that the number of “threads up” may vary from deflator to deflator? That means if you clean all of the parts in one container, you have a slim chance of getting all of the deflators back together exactly as taken apart! So clean one deflator at a time.
STEP 8: Remove all parts from the fluid and dry thoroughly. A Q-tip is a good drying/finishing tool for the Body bore but avoid leaving fibers. STEP 9: This is the usual “assemble in reverse order” step with a little help. Use the pictures at the top for part order reference. Basically, if all of the parts are within, but the Cap won’t start, then the Piston is in upside down. DO NOT LUBRICATE!: Virtually all lubricants – WD40, 3in1 Oil, STP, silicon lubricants and sprays of all sorts, including Sam’s Snake Oil, leave a tacky residue that collects dirt. Dirt is a deflator’s enemy. If you must lubricate, use only a military grade graphite powder that does not contain quartz or other abrasive additives.MORE INFO: Interested in learning how to set your deflators or how they work?
See how they work here.
See how to set the shut OFF, destination pressure, on this page.