EASY & QUICK TO USE ▪ NO TOOLS REQUIRED ▪ LIFETIME WARRANTY* ▪ ADJUSTABLE FROM 4 – 65PSI
PROUDLY MADE IN AMERICA
HOW THEY WORK
Coyote Vortex Venting deflators follow Mother Nature’s lead. They direct tire air to circulate through and out of the deflator like a cyclone thereby reducing deflation time. And our O-ring technology makes setting your destination pressure* a breeze (pun intended).
*Destination pressure is the trail pressure that you have personally adjusted the V2s to automatically shut OFF at. Click here to learn how to do that.
In the interest of safety first, we offer these words of CAUTION.
CAUTION
- Low tire pressure makes for unfamiliar vehicle behavior. Drive with increased awareness when you lower your tire pressure.
- Always have a way to reinflate your tires back up to the pressure recommended by your vehicle or tire manufacturer for highway travel before you air down.
- Compressed air (all gasses) presents hazards. Always use protective eyewear when setting or using Coyote Tire Deflators.
- Never completely remove the Adjustment Cap from the deflator Body while screwed on a pressurized valve stem. This will shoot parts out of the Body and may result in serious injury including blindness and death.
Deflator Parts
To ensure that we are on the same page, here are the deflator’s part names and features.
The Reference Mark simplifies adjustment. Use it to keep track of the Adjustment Cap position.
The Manual Start Ring makes reducing that mid-day (temperature) pressure increase back down to your cold morning start pressure a cinch. It is also used to start and set your deflators.
Set pressure adjustment is achieved by turning the Adjustment Cap.
Spring force is what you are adjusting.
The patented Spring Shaft applies force in the center of the Piston for a perfect seal at the lowest pressure.
Piston up-down movement turns the deflator ON and OFF. O-ring technology simplifies adjustment.
Everything is assembled in and on the Body.
The Lock Nut, secures the Adjustment Cap’s position.
Three (patented) elliptical Vortex Vents create cyclone-like speedy deflation.
The Quick Chuck ensures speedy install and removal for airing down.
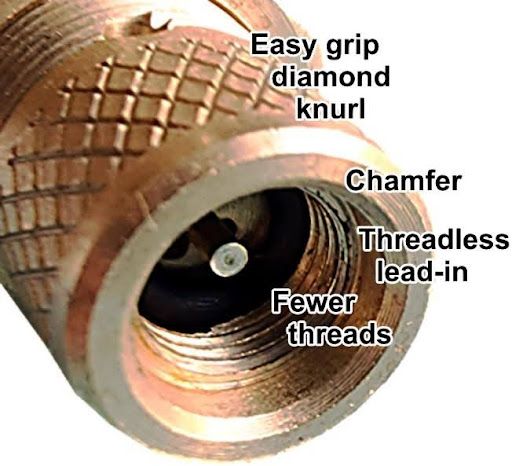
The Easy-Start Threadless Lead-in ensures effortless alignment every time.
The Valve Core Depression Pin fully depresses the valve core to let air out of the tire.

MADE IN THE USA
The Coyote V2 deflator is patterned after compressor tank safety, pop valves. And if it is any peace of mind, our USA manufacturer produces hundreds of thousands of pop valves a year assuring you and Coyote of experienced, quality, competent production. That and attention to design details equates to lifetime warrantied Coyote deflators for everyone.
OVERVIEW
Coyote V2 deflators balance Spring force against tire pressure. When the Spring force is greater than the tire pressure against the bottom of the Piston (Force = area X PSI), the Piston snaps down and shuts the deflator OFF. It stays OFF and will not accidentally toggle ON as explained further down. However, if you pull the Manual Start Ring, the deflator “tests” to see if the tire is at the desired set pressure. If higher by just a PSI or two, it stays ON until it again reaches your set pressure, and then snaps OFF.
Easy Install And Removal
Airing down with Coyote deflators starts with installing your Coyotes on your tires’ valve stems. The Quick Chuck makes that as easy as possible!
The chamfer steers the deflator into the threadless lead-in and then to its threads. Compare the number of attach threads with any other deflator. The Coyotes’ fewer threads mean less twisting to install and remove. Finally, just as you first feel soft resistance, give the diamond knurl a half-turn more to fully engage the O-ring. This ensures a leakless pressure seal. Now pull the Manual Start Ring and move on to the next wheel. By the time you hit the fourth stem, number one will most likely be ready for removal.
Vortex Venting
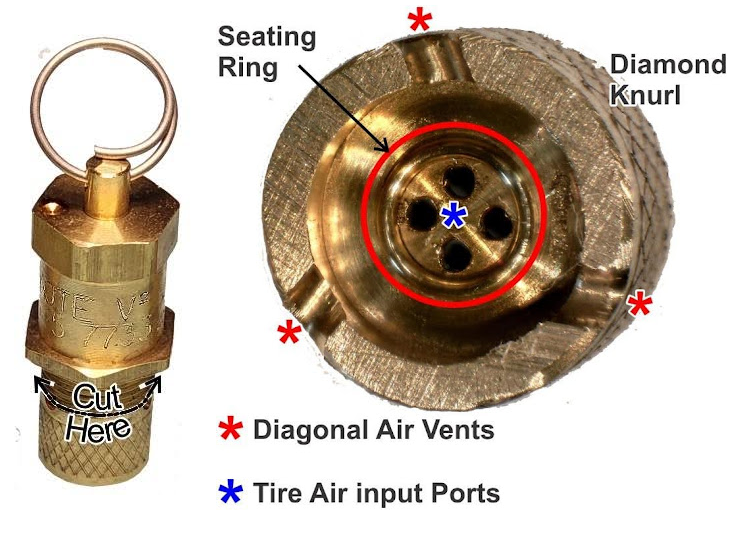
Let’s cut through the body at the vents and see what vortex venting is all about (Figure 2).
Figure 2 reveals three diagonal vents (*) near the bottom of the Body. Diagonal creates an angled, cyclone-like air movement that reduces deflation time. The elliptical openings also contribute to a snappy, toggle OFF action.
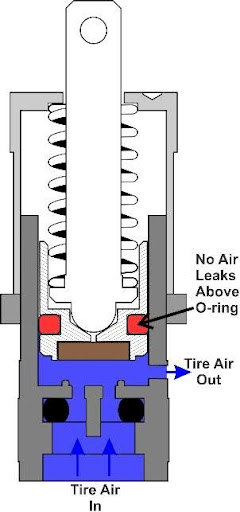
Figure 2 also gives you an up-close look at the Body’s seating ring. When OFF, this ring pushes into the Piston’s seating pad (see Figure 5). This ensures a no-leak seal regardless of how low the set pressure.
The four input ports surrounding the blue asterisk deliver tire air up and into the Body at the bottom of the Piston.
The Piston O-ring (red in Figure 3) makes for no adjustment frustration. It completely eliminates leaks that complicate setting. That is explained next.
TMI
Maybe not? This just looks intimidating and deserves a chance. Our intent is to offer how Coyote deflators are engineered to outperform all other deflators.
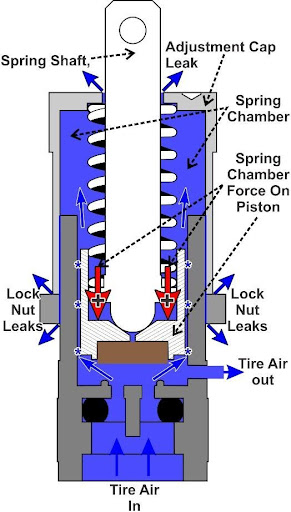
Figure 4 shows how the Body-bore to Piston tolerance allows leaks (*) around an un-O-ringed Piston. The tolerance leaks allow air to flow into the spring chamber, build up pressure and leak at various other places. But the biggie has to do with how this pressure build-up adds to the Spring force (big red “+”arrows). This added force means that the tire pressure lifts the Piston less thus reducing the rate of air flow out of the tire. As the leakage varies with spring chamber back pressure, just when you think that you are all done adjusting, you find that tightening the Lock Nut changes the leaks and affects your set pressure. That is most annoying.
Hitting The Trail With Coyotes Installed
Will Coyote deflators automatically turn ON if left installed on the valve stems? Can “trail bumps” create enough pressure to turn them back ON? The answer is no and here’s why.
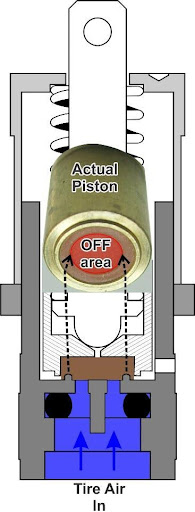
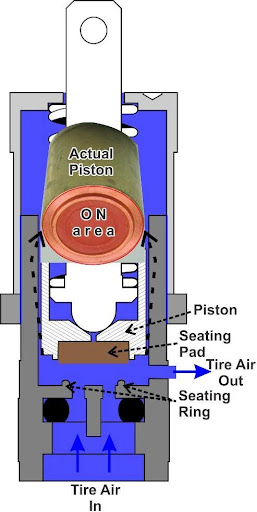
Remember back in the OVERVIEW paragraph where we pointed out that a deflator toggles OFF when the spring force overcomes the air pressure (force) on the bottom of the ON piston? Figure 5 shows that relatively large, ON area.
Why does the Coyote stay safely OFF? Think of it like this: When OFF, the bump pressure can only act on the small OFF area shown in Figure 6. This means that the bump pressure has to be significantly higher than the set pressure to lift the Piston up and ON.
Doesn’t it make sense that it now takes more bump pressure to turn the deflator back ON than the lower set pressure? We have designed the ON Piston area to be 225% more than the OFF, Piston area. It is impossible to 225% bump pressure a Coyote back ON without breaking the rim. You’d have to reduce the tire volume by more than 50% (55.6%). If your deflator bumps back ON, you’d have more problems that a low tire to deal with.
Now, real world #1: Do we recommend driving and not removing your deflators? No. Given a deflator versus rock bashing contest, my hunch is that the brass deflator will survive and the rubber valve stem will lose. We recommend removing the deflators before leaving camp or at the first opportunity because we want to save you the agony of replacing a broken valve stem. Also, let there be no doubt, rock-bashed deflators are not covered by the warranty regardless of who wins.
Real world #2: Is there good reason to leave Coyotes installed? Yes, but it is your choice. As you hit the trail after an early morning air down, the tires are almost always colder than midday. As trail temperatures increase throughout the day, how convenient would it be to just pull the Manual Start Ring to test for, and deflate the slightest possible pressure increase due to temperature? If you know your trails and driving skills, it may be possible to drive many trails with the Coyotes left on to easily reset tire pressure throughout the day.
Conclusion
We are proud of the performance, results-oriented engineering that has gone into our deflators. And we think that the fact that these features have been issued US patents attests to their uniqueness. We welcome your questions, thoughts and recommendations.