BEADLOCK HISTORY AND EVOLUTION
FOUR WHEELING ACADEMY
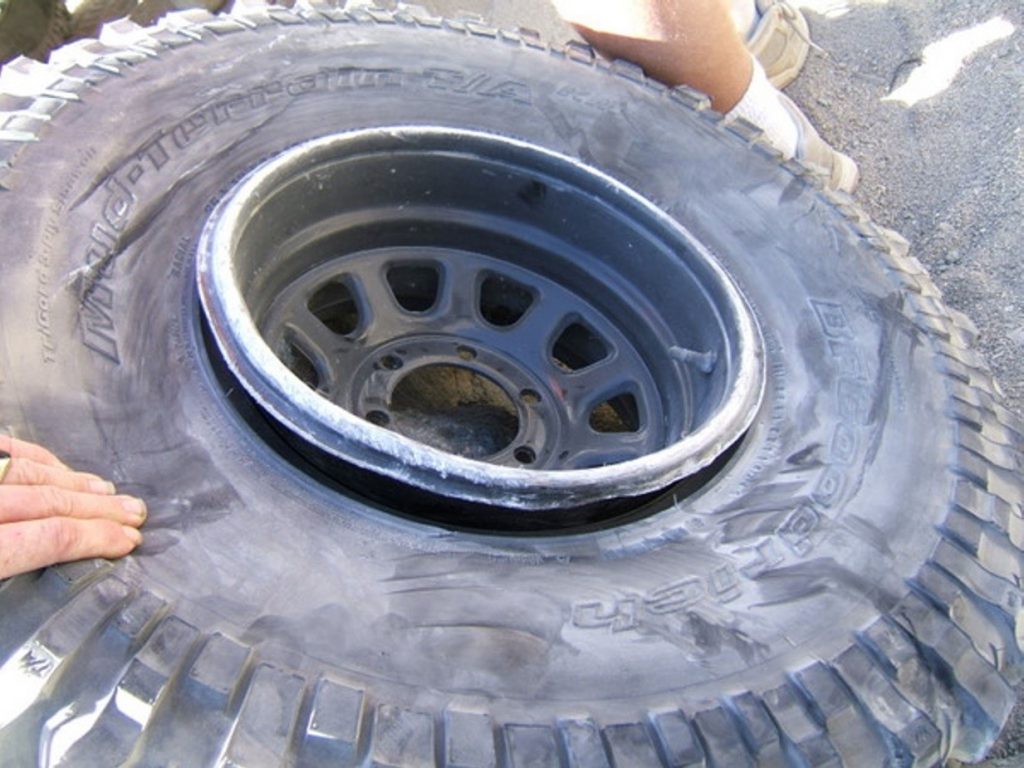
Notice how the steel rim’s OD is rolled back onto itself in addition to the popped bead. Most likely a beadlocked rim would have prevented this altogether.
 If you play in the dirt long enough, you’ll eventually encounter rim- and tire-bead related problems. Popping a bead off a rim is relatively commonplace. While playing and learning about driving sand years ago, I actually popped four beads off at one time. I was side-hilling a sandy slope. I lost the two outside beads on the downside, and the two inside beads on the uphill side. I used this method to safely and successfully remount all four tire beads. This was all pre beadlocks of any sort for me. Here’s a link to a no tire machine method for remounting a tire on the trail.
We’ll first look at what keeps a tire on a standard rim. Then we’ll explain what a beadlock does, talk about how “what it does” is achieved and move through the evolution of beadlock methods. In future articles, I’ll present the Staun internal beadlock tests we performed on Means Dry Lake followed by another article on the evolution, design and features of the Coyote internal beadlock. And for the military and deep-pocketed racers, I’ll show a literally bulletproof Coyote design.
WHAT KEEPS A TIRE ON THE RIM: This picture shows that at street pressure, an inflated tire stands a 90+% chance (my SWAG, Scientific Wild Ass Guess) of not popping the tire off the rim. In other words, when properly inflated and mounted, the tires and rims do their job very well. That’s because two things are working together: The rim’s bead bumps and relatively high (street) pressure. Both securely lock the tire beads on the rim, eliminate air loss, and prevent rim-in-tire spin for average vehicles.
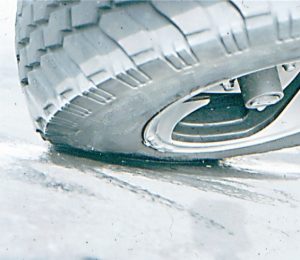
This is a picture of a 5,000+ pound 4X tilted to greater than 45° with 30 PSI in the tires. The bead held without losing air. This whole shebang (bead bump and air pressure) is the essence of why double, internal, pneumatic, boltless beadlocks work so well. They imitate a properly installed tire by locking both tire beads behind the rim’s bead bumps with an internal, high pressure, mini-tire. The mini-tire applies high pressure to the inside of the tire beads. This means that you can run any pressure in the balance of the tire with the peace of mind that the tires are held on the rims by the internal beadlock.
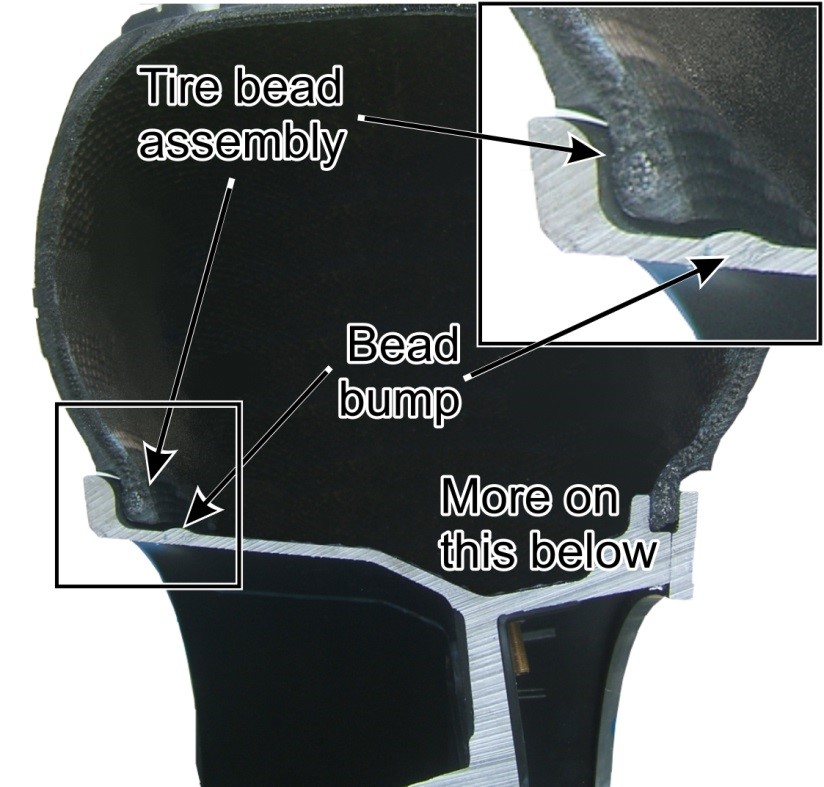
BEAD BUMP UP CLOSE: The high pressure aspect is pretty easy to get your head around, but what about this bead bump thing?
Virtually all conventional, DOT rims have a bead bump. 16.5 inch rims and truck lock ring rims (widow makers) are the exceptions. As tiny as it looks, the bead bump is what securely locks tires to the rim in conjunction with air pressure.
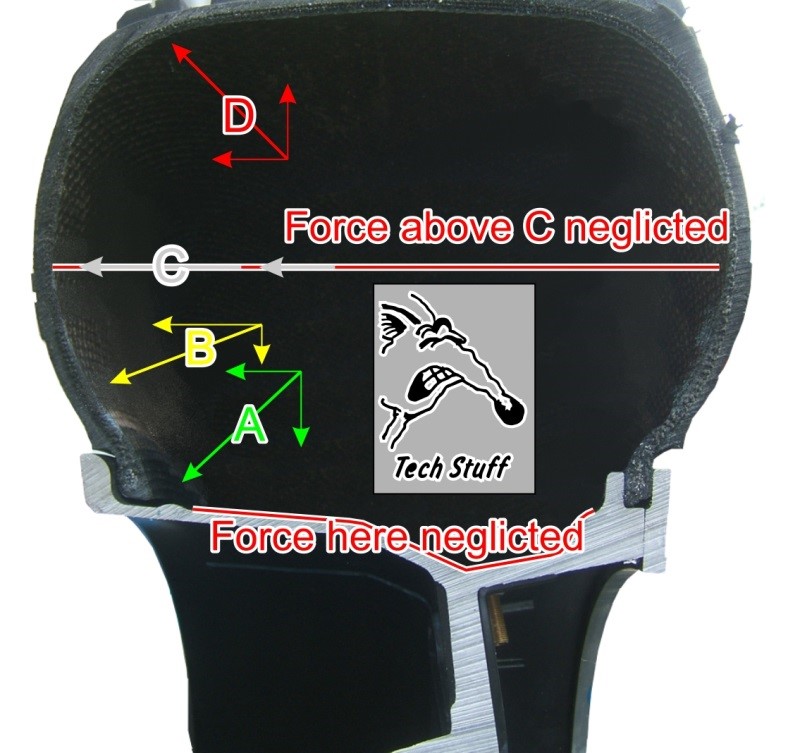
BEAD BUMP AND AIR PRESSURE HOLDING FORCE: In physics, we learn that a single force can be broken down into two component (vector) forces. They are 90° to each other. We can use this concept to calculate air and bead holding force exactly. However, that is really complicated due to the shape of the tire and rim, and lots of unknowns about the tire-to-rim friction. So, I’ll rough out the holding force neglecting the bead bump forces and assume that the tire is a donut (toroid) shape on a smooth rim. But first, let’s look into vector, component forces.
 To start with, no engineer or physicist would let me off the hook without first telling you that a vector force always has magnitude and direction. So why use vector components? All vector forces in the same direction can simply be added together. That’s coming up.
Force “D” is shown with its two component, vector forces. It’s kinda like two brothers, dumb as they are, pushing on a stuck 4X in different directions with different force. One is pushing north and the other guy is pushing W. However, the result is that the 4X heads in the desired direction “D”.
Back on tire pressure, it applies force all the way around the inside of the tire and rim, but …, the vertical components for the top half of the tire (above line C) are mostly undesirable. So, for my approximation, we will neglect the force on the top half of the tire. “A”, “B” and “C” all have left, right and vertically down components, so we’ll consider most of those.
“A” is the optimum force. It is at 45°. At 45°, the components are straight down and absolute left (or right for the other side). All of the forces from “A” up to “C” are contributing to holding the tire on the rim. However, the guys pushing down against the rim serve no tire-holding purpose so we’ll also neglect those, which is highlighted by the red line. Further simplifying, we are concerned with the forces from a little below 45° (A) up to “C” on both sidewalls. That’s roughly 25% of the donut’s total internal surface. And remember, I’m also neglecting the force needed to stretch the tire bead assembly over the bead bump. Ever tried to pop a bead off of a rim? That experience tells us it is pretty significant but nevertheless we’ll neglect it! As you can see, this is a very conservative guess at the total force.
Calculating the force on a 37 inch tire (donut) on a 17 inch rim at 30 PSI, the total force is: 30 PSI X 2665 square inches = 79,950, ~80K force-pounds. 80K X 25% = 20K pounds of air pressure holding the beads on the rim. So, my static 5,000 pounds of tilted vehicle shared between two tires, pushing against that itty bitty bead bump plus air pressure, doesn’t seem quite as threatening as you might have first thought. Does the internal beadlock do the same job? Not exactly, but: 1) Close and also, 2) It could be running 50 PSI (~67%) more air pressure than our example above. Meanwhile, let’s get back to what beadlocks do.
WHAT DOES A BEADLOCK DO: Beadlocks securely lock the tire to the rim. This prevents popping tire beads and spinning the rim in the tire. The latter happens with very, very good traction and lots of engine torque like with drag cars and off road rock crawlers. Popped beads also happen at low tire pressure and high side forces as in oval track racing or off road side-hilling. We want to keep the tires firmly on and locked to the rims under all use circumstances. That’s what beadlocks do.
HOW DOES A BEADLOCK WORK: The tire-to-rim locking function is achieved in several ways. What my best research tells me is that drag racers were the first to want tires locked to rims. Next came the “combat wheel” (i.e. conventional beadlocks) followed by mechanical, internal beadlocks. In the early 1990s, a friend, Olle Högberg, introduced the pneumatic version of the internal beadlock to the Swedish military.
DRAG RACE RIM SCREWS: Drag racers accomplish this tire-to-rim-locking feature by using sheet metal screws that go through the rim and into the tire at the beads. This is still used and there are several special, commercial screw products marketed for drag racers. They are called tire screws, rim screws or wheel screws. I have yet to see off-roaders use screws.
COMBAT WHEELS: In 1980, Marsh Racing Wheels introduced the mechanical, external lock ring approach. It was primarily for the military. This led to many others offering what we now know as the conventional, mechanical beadlock rim. Some call ’em beadlockers. Blink your eyes a bit and checkout this beadlock cut away. A special lock-ring, (2) bolts (1) to a special rim (4) and mechanically pinches the outer tire bead (3) to the rim as pictured.
The upside to combat rims are: 1) They make field tire mounting easier. 2) They strengthen the outside of the rim. Remember the title picture? There are also do-it-yourself kits to economically convert standard steel rims to beadlock rims.
The downsides are: 1) The special rims typically cost far more than conventional rims. 2) They may not be street legal. Check with your state’s Department of Motor Vehicles or Highway Patrol for your local laws.

3) There may be lock ring bolt, torque maintenance issues. Keeping the bolts tight usually requires regular maintenance. 4) They may leak. Improper torqueing may lead to this. 5) There may be balance issues due to the lock ring. The extra weight on only the outside of the rim may lead to dynamic balancing problems. 6) The most common mechanical beadlocks only lock the outside tire bead leaving the inside tire bead to burp air. However, expensive, double beadlock rims that mechanically lock both the inside and outside tire beads have recently appeared on the market. 7) Double or single, most are not made in the USA. 8) Most beadlock rims have maximum tire pressure limitations (typically 30 or 35 PSI). This is one of the reasons why some states outlaw conventional beadlock rims.
High tire pressure undesirably pushes against the lock ring. This may reduce its air and tire holding capabilities. If you own beadlockers and have regular lock ring bold circle torque maintenance issue, there is a good chance it is due to high tire pressure.
It’s also important to understand that not all of the rims that have bolt circles are beadlock rims. Rim manufacturers have capitalized on this glitz by marketing wanna-be look alikes.
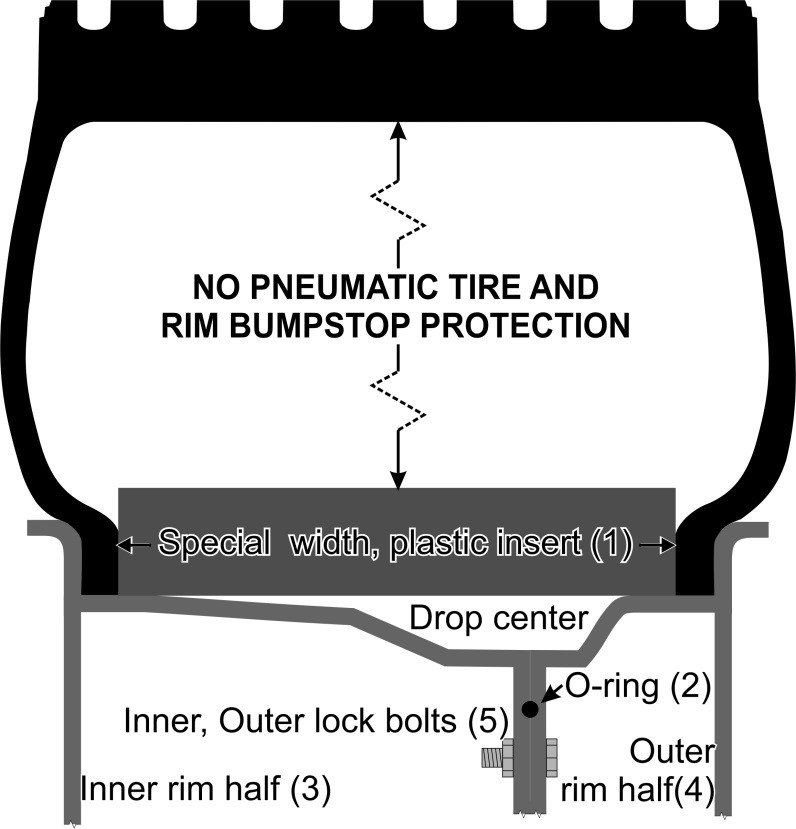
THE MECHANICAL, INTERNAL BEADLOCK: This is my graphic representation of the concept. It’s what the US military uses. This mounting-challenged, special rim product requires a third part. The additional part is a solid piece (plastic) that fits inside, above the drop center. It tightly fills the space between the inside of both tire beads. When you tighten the two halves of the split rim together, the plastic piece pinches the beads against the rim.
Since not all tire beads are made to the National Tire and Rim Association’s standard specified width of 0.5 inch, the plastic piece must be perfectly sized for different tire bead thicknesses. I’ve seen off road tire beads up to one inch wide. The manufacturer claims you don’t need a run flat, but I don’t see it that way. It still has tire collapse that generates tire destroying heat.
The mounting nightmare comes with juggling parts 1, 2, 3 and 4 while installing the “lock-together” bolts and nuts and keeping the O-ring in place. That’s after you have muscled the circular, bigger-than-tire ID plastic piece inside the tire.
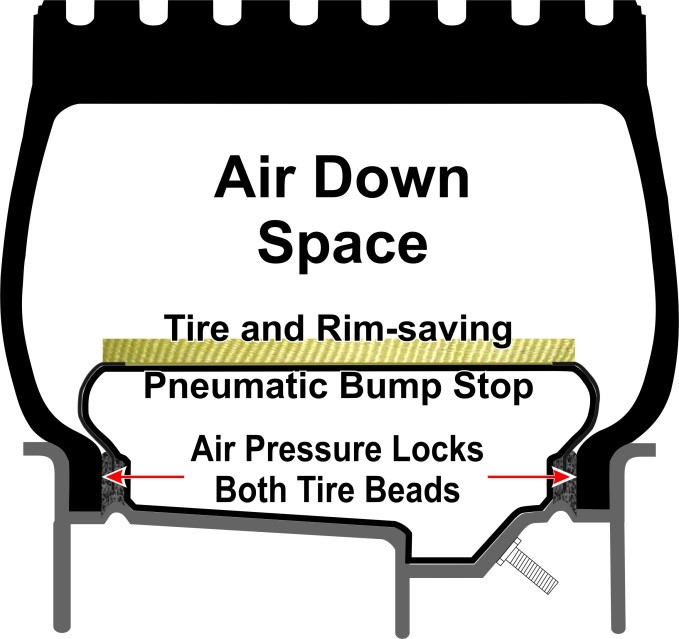
PNEUMATIC INTERNAL BEADLOCK: This solution is a NASCAR-like inner liner. However, from inception, it had two basic problems that slowed public acceptance. Let’s first address the concept.
The pneumatic, internal beadlock is similar to NASCAR, mini-tire, inner liners within the primary tire. Each “tire” has a way to inflate its independent, separate air chambers. The NASCAR goal is to keep the car under control at 200+ MPH when you get a flat. Otherwise, you are in trouble, big time! With an inner liner, you have a second chance due to it keeping the tire more or less fully “inflated”. That’s all well and good for NASCAR cars but they don’t need to air down. Off road, we need air down space above the inner tire. Enter Olle Högberg’s Tireloc designed for and used by the Swedish military, circa ~1990.
SWEDEN’S ![]() : The military needs at least three things regarding tires, the first would be a perfectly bulletproof wheel, but that’s yet to happen. A run flat is a worthwhile second goal. Lastly, they need to be able to change air pressure for various terrains. Olle’s Tireloc fulfilled the last two requirements.
: The military needs at least three things regarding tires, the first would be a perfectly bulletproof wheel, but that’s yet to happen. A run flat is a worthwhile second goal. Lastly, they need to be able to change air pressure for various terrains. Olle’s Tireloc fulfilled the last two requirements.
And in case you did not know it, many USA military vehicles have Central Tire Inflation Systems (CTI). I know of off road racers that have or will have CTI. This means while on the run, they can adjust tire pressure or overcome small leaks.
Tireloc was an offroad-configured, NASCAR inner liner. It profiled the mini-tire down low so there was air down space between the top of the “mini-tire” and the underside of the tire tread. See Air Down Space above.
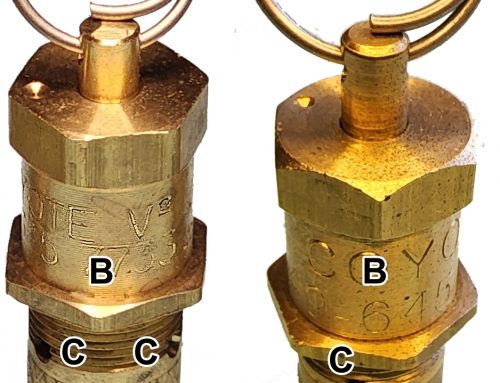
INTERNAL BEADLOCK HISTORY: Olle’s invention, was followed by several interim manufacturers. Coyote, currently, is the latest version of the internal beadlock. Coyote Enterprises started importing Staun’s beadlock in 2005. I evaluated and published a Staun internal beadlock article in my newsletter. This eventually led to me becoming part of Staun USA. About five years later (late 2010), Staun went broke. I was left with a decision: Skip importing beadlocks or make them myself. Having experience firsthand the two problems mentioned earlier, and having a reasonable grasp on potential solutions, I chose to take on redesigning and manufacturing pneumatic beadlocks in the USA.
This link takes you to the original Staun beadlock tests and how Coyote improvements made them even better.