WHEN WILL I ROLL?
FOURWHEELING ACADEMY
WHEN WILL YOU ROLL? You will roll when your center of gravity goes beyond your downside tire contact point. This article presents a way to check that on the trail.
The above was more than a “Let’s see if we can break it episode.” It was a real world balance test that took place in 1994 in Norm Clow’s Serra Lumber yard in San Clemente, CA. Big Bertha, his bigger-than-average fork lift (left) provided a lifting platform (see the tire platform board shadow lower center). That assured the test was like driving on a side-hill and not just lifting the frame with tires hanging. Hanging tires would throw off the true center of gravity. The yellow safety straps between the 4X and Big Bertha kept the 4X from rolling right. Big Red (my ex black diamond trip leader, 6’ 8”, 250#,) pulls on one of the two tether straps while I push from the right. Being only 6 inches past equilibrium (perfect balance), the two of us could not bring it back into balance. Further, we were monitoring weight transfer with Rancho Suspension’s weight measurement instrument (thank you Rancho), visible bottom right corner. You can see the wires leading to the four (tire) strain gauge platforms. Once we saw no weight increase on the driver’s side, we knew we were at or past balance. But first let’s kick this whole article off with some CYA qualifications. Keep safety in mind throughout the entire article and during all tests that you choose to perform!
CAUTION: Read this article with safety and caution in mind. You are about to embark on an engineer’s journey through center of gravity! Understand clearly that the engineering world and the real world struggle to relate … with words alone!


KEEP THE RUBBER SIDE DOWN: This article is about keeping the rubber side down – avoiding rollovers. At some time or other, we have all been concerned with rolling. It’s natural, it’s to be expected and that’s a good thing. Your concern with level is your survival safety warning. Learning your 4X’s approximate rollover point is useful. That is what I offer in this article. I want to give you a way to measure a situation and predict the chances of rolling. The results of letting your ego get in the way of not checking balance are obvious. Rectal vision, “I should have checked that” is a useless excuse. This picture was on a Truckhaven Hills, CA, black diamond weekend training.
APF: In my how-to-drive classes, I lectured about your A P F. That’s your, A*****e (something nearest your seat cushion) Pucker Factor. It normally goes off long before you are actually in danger of rolling. However, there are a numb-butted few who have no fear of tilt, or maybe no sense of level. For them, the only way to learn, if ever, is the hard way. My advice comes from experience. I have been involved in 12 rolls. One was with Gemany’s Camel Trophy driver in his five cylinder diesel Mercedes Geländewagen (G Class) 4X. These guys are worshipped like royalty, but no one is immune to rolling.
MY GOAL: What follows helps you learn about center of gravity. My goal is to give you a way, when on a tilt, to stop and approximate how close you really are to rolling. And with that, here’s another word of caution.
STATIC VERSUS DYNAMIC CENTER OF GRAVITY: What follows is about your static rollover danger point. Get real clear right now that static means not moving. Once you start moving you are now dealing with your dynamic center of gravity. Picture static is kinda like being balanced and breathlessly still. Driving, even very, very slowly, over a grape-sized pebble under a high-side tire can catapult you instantly on your roof! Dynamics are a whole ’nother game. Be movement-cautious when headed for tilt.
CENTER OF GRAVITY: Everything has one; dogs, sticks, stars, flowers, people and cars. If it has mass (when gravity acts on it we call it weight), whether it is living or inanimate, it is the basis for balance and stability. Center of gravity is a magical point that exists for all things star-sized big or quantum-sized small. It typically can’t be reached or touched, but it is the basis for predicting aircraft flight dynamics, kangaroo jump trajectories or how far a 4X can lean before rolling. For the critical technocrats out there, please cut me some slack regarding the precise use of terms and concepts. But for all, again, be aware this article deals with static (non-moving), laboratory-like conditions.
DYNAMICS DEFINED: The real world deals with dynamic (moving) conditions. Do not underestimate the effects of movement (dynamics)! My intent is to give you a tangible way to statically predict when you and your 4X are approaching a potential roll. Future FOURWHEELING ACADEMYs will deal with what to do as you roll and how to recover a rolled 4X. There are more to these than meets the eye. You’ll only carelessly release your seatbelt once while upside down to learn that it can be very hard on your head without knowledgeable preparation.
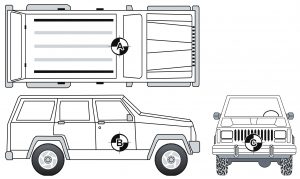 CENTER OF GRAVITY DEFINED: Picture barbecuing a chicken on a rotisserie. You’d like to run the skewer from head to rear and have the bird turn in perfect balance (C). Now picture two different approaches. Another skewer could run sideways from wing to wing (B). A third could run up and down from between the feet and out through the back (A). Each skewer could lead to a perfectly balanced meal. Not all are necessarily practical, but nevertheless, the fowl would be smoothly turning. The three skewers intersect at the center of gravity (CG).
A 4X’S AXES: Take a deep breath and relax. The following mental gymnastics are not easy to follow.
To the techie, each skewer represents an axis of our three dimensional world, up-down (A), left-right (B) and front-back (C). I hope it’s easy to see from the diagram that all three axes intersect (cross) at a common point. Do you see how each is in line with the other two? B shows this best with A above and C to the right.
PERFECT BALANCE: Hang the chicken from a magic string connected to the (otherwise) inaccessible CG point. Now, given that the legs and wings (like gasoline in the 4X tank) don’t flop around like they really do, you could move the chicken (4X) to any position, head level, feet up, tail at an angle and so on and it would stay put. It is in perfect balance. Suspended from the CG, anything and everything is stable in all positions. 4Xs have a center of gravity.
THE THREE AXES: The orthographic projection shows all three straight-on faces of a 4X. Each view’s CG axis symbol (![]() ) is like a skewer. It represents the “barbequing”, rotation axis. For 4Xs, we are most concerned with the vehicle’s front view, axis C. This axis has to do with rolling sideways, left or right. The axis through the door has to do with steep-hill, end over end rolls. The top view is a compound roll where the 4X is on its side and then rolls end over end. I’ve confirmed that the actual CG (point) is usually near your center console.
) is like a skewer. It represents the “barbequing”, rotation axis. For 4Xs, we are most concerned with the vehicle’s front view, axis C. This axis has to do with rolling sideways, left or right. The axis through the door has to do with steep-hill, end over end rolls. The top view is a compound roll where the 4X is on its side and then rolls end over end. I’ve confirmed that the actual CG (point) is usually near your center console.
APPROXIMATING THE CG POINT: Use this generalization to conservatively estimate the CG for most sport-utility vehicles. This will help you find your 4X’s approximate CG.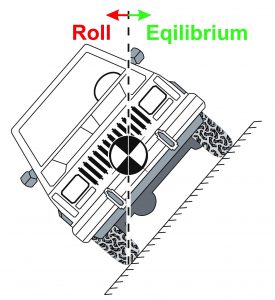
Sit in the driver’s seat and picture that your CG is where your right fist would hang down at your side, arm fully extended. You probably can’t get your fist that low, but that is about where the CG is located. Working from your fist, mentally project the three axes to the outside of the 4X. There’s one axis that goes through the doors and another that goes through the roof and floor. The one that goes through the radiator and back seat is the one of most interest.
With a friend on the outside of the vehicle, the two of you can identify where those skewers pierce the 4X. The reference point in the grille will get the most use, so lock this one firmly in your mind. We’ll now learn how to use this point.
EQUILIBRIUM: In the front view (C, technically this is called an orthographic projection’s side view), with the 4X on level ground, the weight is almost equally distributed on the left and right tires. You are now going to drive onto an increasingly progressive, steeper and steeper side-tilt. As the driver’s side tires go higher and higher, the weight on the passenger’s side tires increases. Accordingly, the weight on the driver’s tires decreases. This is weight transfer. At some point, all of the weight is borne by the (vehicle) right tires and the left tires bear no weight. This is the static balance point. For this exercise, the 4X is straight-on level front to back – i.e., the chicken’s head and tail are level. It’s just balancing, cockeyed on one leg. The techie dudes say that the 4X is at/in equilibrium. The weight is equal on both sides of the CG symbol. Note how the CG relates to the downside tire(s). It is directly and exactly vertical over the lower tires’ outside contact points. A laser could cut the 4X in half through the CG and tire contact points. One piece would fall left and the other right. Each piece would weigh exactly the same.
ROLLING: Now picture the 4X going farther over as this figure shows. The center of the CG is now beyond the tire contact point and therefore more weight is on the passenger’s side rather than the driver’s side. This 4X would roll in the direction of the CG symbol.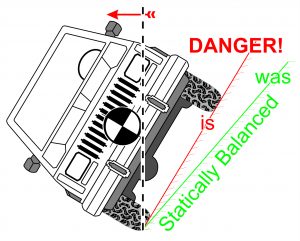
To help understand this, picture, make another vertical cut through the tire contact point. It should be easy to see that there is more weight on the CG symbol side versus the other side.
WAR STORY: In addition to lecturing at colleges, I also used to train people (employees) that had to use 4WDs in their daily job performance like cell site technicians. As you might expect, they are a cross section of society. One  guy was a VERY buff bodybuilder. After the lecture driving company 4Xs, I’d have them experience the chalk and blackboard info firsthand. I had a side-hill that set off everyone’s APF. With my 4X stopped where everyone’s APF would scream uncle, one by one, I’d have them sit in my driver’s seat to experience an extreme but safe side tilt. Mister America got in my 4X and proclaimed, “I’ll bet that I can push this over.” He tried and failed and this guy could probably squat a half a ton.
By having the students experience this side-hill before driving it, I was somewhat sure that panic would not set in. Panic could lead Mr. Berzerko into instantly doing the wrong thing. With panic comes the belief that if you drive a threatening side-hill fast, you’ll stick to the ground like race cars do on sloped track. Or maybe you just want to immediately get the tilt over with. Absolutely do not believe it! Speed works against you and brings dynamics into play. Speed plus small bumps combine to create dynamic forces that can tip you over. Log this in! It is the real world. The correct thing to do when you feel roll coming on is to steer straight downhill. Keep the 4X moving through the straight downhill turn and then stop when pointed straight down. What happens on the way to stopped depends on the terrain but it is most likely better than ending up on your lid.
 I used to lead tours through Copper Canyon, Mexico. I call it the world’s best kept secret. It is a complex of six Grand Canyon-sized canyons, one of which is 100 meters deeper. It was two weeks in Mexico with one week on dirt roads and remote trails that were 250 miles from civilization of any sort. To bring that into perspective, lacking gasoline stations, I had gasoline spotted throughout the canyons to accommodate the distance. As you might imagine, a 15 4X caravan could get pretty spread out. As I approached a real APFer, I advised on the radio of how to drive it. I warned against speed. One traveler ended up on his side and the observer just behind confirmed that he had sped into it. Fortunately, I had several experienced guys and gals nearby that righted him before I got back to the mishap. BTW, knowing “experienced” recovery tricks, I’ve yet to have a roll that could not be immediately driven away.
APPROXIMATING YOUR ROLL POINT: If you do this exercise, I recommend doing it on an increasingly side hill-angled slope. I find the banks of dry washes work well. You will gently and slowly drive up the bank in the direction of an increasing slope. My hope and recommendation is: Listen to your APF! It usually ensures you will stop well short of rolling. It is fair to use what I call the crawl before you walk before you run approach. You do not have to go for gold on test one.
SAFETY FIRST! And here’s another word from the Safety Officer: Set up these safety practices (and your additional concerns are encouraged): (1) Driver and passengers, -everyone-, always wears their seatbelt. No exceptions, but it’s probably best to have the passengers watch from outside the 4X. (2) Make sure that everything in your 4X is tied down. Big Red answers the “Should I tie it down?” question this way. Lay on your back, face up, mouth open. Have a friend hold the item in question at hip-level over your teeth. If you do not want him to drop it, tie it down. If you even remotely consider dropping it, don’t, but do see a psychiatrist and a dentist … test over!! (3) Approach the side-hill, driver’s side up. (4) Only exit on the upside. This is aided by (3). Exiting a 4X on the downside is always risky. In the exit process, it could roll on you. (5) During the whole process, keep the downside clear of onlookers, pets and everything you value. Observers must be ahead, behind or on the uphill side, never on the down, roll-side. (6) Finally, avoid the 4X’s downside 100% of the time. Rolled 4Xs can be very unstable.
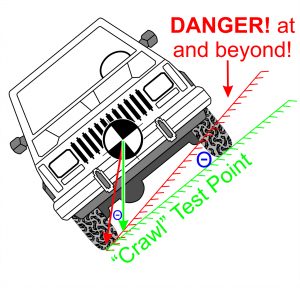 TEST PROCESS: Drive to a crawl-safe, test point and stop. From outside the 4X, hang a plumb bob from your right fist, front, CG projection point (C). This is represented by the green line with the arrow pointing down. Any weight on a string will do. It most likely will point well inside of the tire contact point. Now swing the weight (green arrow) out to the tire’s outside contact point (red line). That angle is approximately how much more the 4X can statically lean before rolling. The equilibrium ground line is shown in red. The angle between the red and green ground lines (Θ) is the same as the plumb bob swing angle. Stay away from driving to equilibrium, the red line. Just a breath beyond that is the point of roll! Don’t get too close!
The above is what I have taught in classes for years, but I truly did not know the reality of my CG approximation method until I tested it. However, long before I performed the tests, Rancho’s Chief Engineer had confirmed that it was a good guess. With the help of friends and Big Bertha (top), we put the plumb bob to metal. For three different 4Xs, the right fist CG approximation method proved to be pretty darn close.
TOUGH TIRES: I was also pleased to learn that the tires did not collapse off the rims, pop the beads (see title photo insert). We started at MAX LOAD rating (50 PSI) and ended up at my street pressure, 28 PSI. The BFG TAs appeared as though they were on level ground with virtually little side displacement.
LOAD CONSIDERATIONS: We also tested my Explorer with driver, driver and passenger(s) and loads in various spots including on the roof. I was amazed at how little loads affected the static CG. My hunch is that the static CG is mostly determined by your engine, running gear, spare tire and gas tank … the heavy stuff down at the axles. The glass and body sheet metal contribute little to the static CG. However a top load REALLY can contribute to dynamic CG instability!
CONSERVATIVE CONCLUSION: These tests indicate that when going very slowly, so the dynamics (movement) of the situation do not enter into the equation, and under ideal conditions, your 4X may slide sideways on a slippery sloped poor traction road before it would roll.
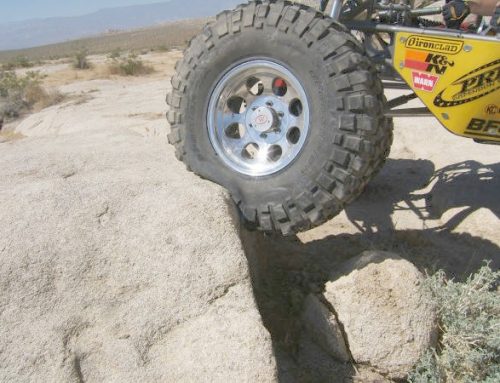
NEVER UNDERESTIMATE THE EFFECTS OF MOVEMENT: It is obvious that 4Xs do roll, and my hunch is that is due mostly to dynamics and driver inexperience. Never underestimate dynamic effects or what I call compound angles. Calculations, not presented here indicate a combination of going downhill and side-tilt are most dangerous. I believe the second image above came with a compound, downhill, side-tilt situation. Doesn’t it look otherwise mostly level?
Got any roll pictures that you want to share on the site?