BEADLOCK TESTS AND FEATURES
FOURWHEELING ACADEMY
This picks up where “Bead Lock History and Evolution” left off. Here, I present the original tests from my ECO4WD newsletter, other tests and conclude discussing the features that count when buying beadlocks. But first, a thought.
CONFIDENCE IN AIR: I want first to address a gut feelings that I have. My hunch is that most of us (me included) have a better feel for what nuts and bolts (conventional beadlocks) can do versus what air can do … a balloon if you will. I trust nuts and bolts, period! I’m iffy about air. I can just get my head around clamping a tire bead between two pieces of metal versus some fluffy wad of air pressing two things together. You too? However, air, actually all gases, are way underrated BIG TIME! Tornados, hurricanes and cyclones are just air. Got any doubt about what they do? Rockets get to the moon via hot air. Steam powered things get their oomph from a gas, water vapor to be precise. And right down to the meat of it, every form of internal combustion engine works because of an expanding gas. Air power is way underrated! You are not gambling with regard to force when you understand and give gas (internal beadlocks) a chance.
WORKING TOGETHER: For the original beadlock article there were many participants, and many go unaccredited,  particularly Blaine Johnson’s friends at the test site at Means Dry Lake, CA. This is the home of the Hammer trails and Hammertown, the infamous King of the Hammers start/finish line. The article shows how a few friends can team up and produce some pretty viable information. We don’t look as slick as the popular publications and sites, but our information is complete and accurate. My perpetual goal is to provide performance, results-oriented, physical reality-based information that is not constrained by advertising dollars or marketing hype.
Interested in participating in future information gathering? Send me an email harry@coyoteents.com. Got a specialty? Add that to the email.
Staun Products (Australia) provided the test beadlocks. George Carousos of Extreme Outback Products (Vacaville, CA) donated the Tyrepliers® way back in 2001. The primary test platform was Brian Jensen’s ’97 TJ and rims. Master fabrication genius Blaine Johnson’s tools and garage were the installation stage. Ken Obenski, a registered professional engineer is my ever-present technical sounding board. Most importantly, Chris Johnson, Public Affairs Officer of the California Highway Patrol, Santa Ana, CA office was invaluable with DOT legality questions. He did a terrifically creative job of researching their legality for both California and the Federal DOT. Darren Bradley, owner of Spectrum gas did the burst test for us. Thank you all for your support.
BEADLOCK TESTING: The Staun internal beadlocks were tested on Means Dry Lake and the surrounding Hammer Trails. The objectives were to try in the worst possible ways to: 1) spin the rims in the tires; 2) make them leak air; 3) pop them off the rims and; 4) see how protective the bump stop feature was. This was an internal beadlock “concept” test. In the years since, Coyote’s real world performance testing has gone beyond those first tests. Following are portions of the ECO4WD newsletter article and more. And please excuse some old quality images.
RIM-IN-TIRE SPIN: With Brian’s ’97 TJ test vehicle, we reference-marked the valve stems to the tires. With the tires at 7 PSI and the Stauns at 48 PSI, no rim spin was ever detected after a full weekend of testing and having fun.
HALF FLAT: After no rim-spin was confirmed, we compared a flat Staun-equipped wheel against a flat, conventionally beadlocked wheel. This shows the bump stop support that an internal beadlock offers. I call it a half flat. The conventionally beadlock tire fully collapses, wrinkles and generates heat as it rolls. That’s what happens when you drive on a flat, beadlocked or not. You heat and weaken the tire to the failure point. Internal beadlock-equipped wheels reduce the flex and lengthen the drive time.

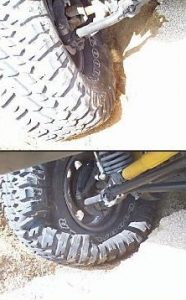
 BEAD POPPING: Next, we flattened all four tires and tried to pop the beads the way the hard core guys do to fix a flat. They winch the 4X sideways and drag the bead off. A close-up on the right rear follows.
I forgot to try another bead pop method that these guys use. They drive a vehicle up on a flat-on-the-ground lying wheel. Add that to your getchaback box notes.
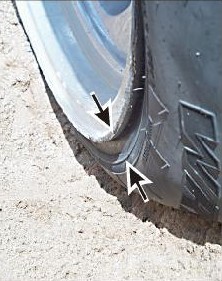
Here’s how it looks down close to the tire bead. Although the side-pull is obviously stressing the Coyote, she ain’t givin’ so much as an inch! We never succeeded.
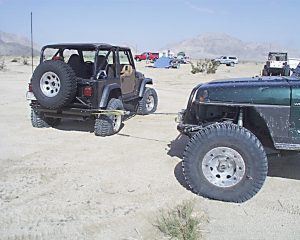
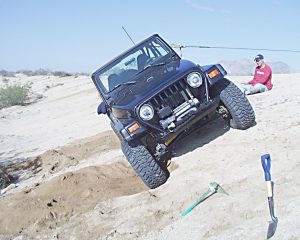 SIDE-HILLING VULNERABILITY: We next dug holes on the down-side tires to give us extreme side tilt. Using what you will learn in the upcoming FOURWHEELING ACADEMY, “Approximating a 4X’s Center of Gravity”, we secured the TJ at its equilibrium point. See the snatch strap on its roll bar? This link takes you to a past ECO newsletter Recovery reprint that’s an article preview. It starts on page 18.
Side tilt showed us tire flex for various combinations of inflated and flat standard and internal beadlocked wheels. The bottom two pictures show the stress on the test TJ’s inflated and flat tire.
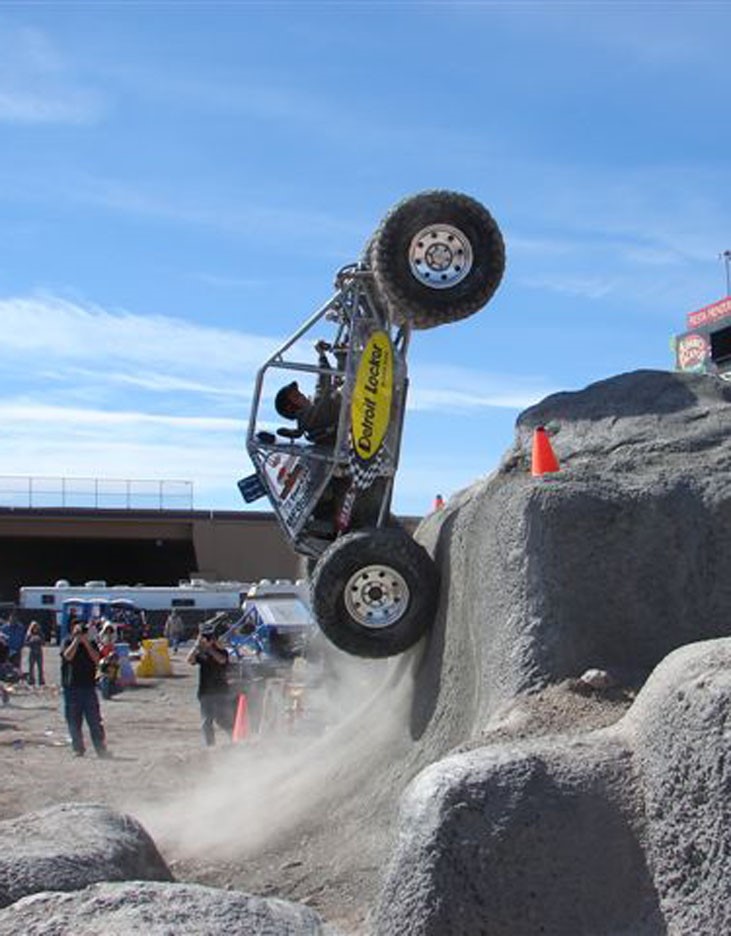
But that was only a conservative, static force test … no movement. How about diagonally driving the flat off of a three or four foot high bank at an angle? This would dynamically crash-stress the poor puppy into the bottom of the wash. The back right wheel is about where the front launched from. I gritted my teeth on the first try, but the pup survived with a wagging tail. The bottom picture exposes the buried, bead-stressed tire. I expected to see the tire rolled under more.
SAND HILL TRACTION: Next, I wanted to test the traction at ridiculously low pressure. Some were concerned with the internal beadlock not allowing the tire to flex to its fullest. The test started with three tires at 6 PSI and one fully deflated. With this, the TJ could not make it up our sand test-hill. And you must remember we were in the “slow climb” mode and not the “speed launch” mode. With three tires up and one flat, we got stuck. We skipped the in-between and went directly to four, fully deflated, flat tires.
With four flats, we easily drove up the test-hill. We would steadily progress up the hill alternating spin and progress. The tracks showed the flat tires were acting somewhat like sand paddle tires. We’d see a little spin, then it would hook up, move forward and so on to the top. What I learned was that internals in no way inhibit low-pressure tire flex and traction.
Torturing four deflated tires for hours is what impressed the hard core folk the most. To see a four-flat-tired 4X twisting and turning, dropping off a bank, and climbing sand hills without losing so much as a bead or ounce of tire pressure is pretty impressive.

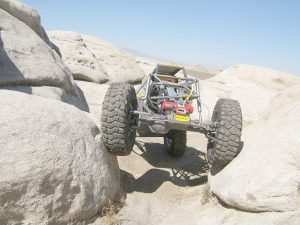 ULTRA4 CLASS TESTS: It was not long thereafter that Cody Waggoner LaserNut.com) wanted to see how they would perform in his ULTRA4, 4400 class car. Here’s three of more than 100 test pictures.
STRESS ’EM TWO AT A TIME: This is just what it looks like, two 7 PSI tires being pinched sideways. The backs followed in the same track. The tires didn’t even know they had been stressed.

BUMP STOP PROTECTION: The 48 PSI Coyote bump stop kept the tire for being pinched between metal and rock. The distorted rubber never reached the rim. The bump stop keeps the two apart.

JENNA DROVE, TOO: Note the three little peepholes in the top plate. They are kinda like windows in competition sail boat sails.
IN COMPETITION: Want to try this in your 4X? What’s that, you do not see beadlocks? Wrong! Air’s invisibly doing the beadlock job on the inside of the tires!
BEADLOCK PURCHASING CONSIDERATIONS: It’s not like buying beadlocks is a no-brainer thing. It starts with what they will be used on: a trailer queen or daily driver. I’ll primarily address daily drivers and comment on trailer queen differences as I go along. A daily driver is mostly used on the street and less often off highway. The trailer queen gets to ride on the royal carriage to the trailhead before she gets her feet dirty.
Start with considering whether you really need beadlocks or not? The answer to this question starts with why you are considering them at all. Preventing popped tire beads is number one for most. For the serious overlander and off road racer, beadlocks are a must. If you use my 15+ years of tour-leading experience as a basis, most do not need beadlocks but there is a caveat. All tour participants were following me and therefore their driving style was constrained by mine. I’d narrate the dos and don’ts, and the good track on the CB radio. How you drive seriously sets whether you pop tire beads or not.
Do your wheels have to be street legal? Beadlock legality varies by state and country. At the international level, some countries strictly regulate all automotive aftermarket products. Your legality requirements are determined by your local highway agency. Save the agony of future problems by checking first.
Some ponder looks. Wannabe beadlocks came about due to this. Some folks like the mechanical beadlock look, others don’t. Looks are a side issue for me.
Another consideration is: Does your choice require all new rims or can you use your existing rims? New rims can easily add $600+ to the cost of beadlocks.
Do you want to lock both the inside and outside tire beads or will locking just the outside be OK? Some will tell you that they have never popped an inside tire bead, but what I also frequently hear is that the insides burp air. Greg Mulkey of Raceline Wheel recommends using Coyotes inside their rims when they have an air-burping problem.
Next, how much labor you are willing to put into owning beadlock wheels? Most require some kind of ongoing maintenance like bolt circle torque maintenance or frequent tire pressure checks. All mechanical beadlock tire bead seals are not perfect.
In addition to locking the tire bead(s), does your choice provide an internal tire- and rim-protecting bump stop? The hard core racers have taught me this is an off road racing must!
Are there any balance issues with your choice? Dynamic wheel balancing is very sophisticated. Conventional mechanical beadlocks complicate this with more rim weight on the outside than the inside.
Is rotating mass (angular momentum) a consideration? This has to do with accelerating and braking. The more wheel weight, the slower you accelerate and stop.
Wheel weight is unsprung weight. I know of no one that says more unsprung weight is better. Less just makes for better overall handling and less vehicle stress.
Some beadlocks have an inherent … what I call … a “limp flat” capability. No beadlocks are NASCAR inner liners run flats. Some beadlock designs are better than others. Internals keep the tires on the rims for an off trail stop.
The time it takes to air up and down is also a consideration. Internal beadlocks air up and down faster due to some of the internal space being occupied by the beadlock.
INTERNAL BEADLOCK FEATURES, ADVANTAGES, AND BENEFITS:
USE YOUR RIMS: You can use internal beadlocks in rims of all sorts. They can be fitted to conventional steel and alloy rims … the material does not matter. Conventional single and double beadlock rims accommodate internals as do split rims. All you have to do is drill a 5/16 inch (8mm) hole to accommodate the beadlock’s valve stem.
LOCKS BOTH BEADS: Internal beadlocks apply force from the inside of both tire beads. That presses the beads firmly against the rim at the beadlock inner tube pressure. Right at the tire bead, the tire thinks that it is totally inflated to that pressure. Oval racers particularly welcome this added bead-holding, cornering advantage. With internal beadlocks, you do not burp air … period. Burping air is a thing of the past with internals. Our tests proved that.
ADDED TIRE AND RIM PROTECTION: Pneumatic internal beadlocks act like a 3 inch high, 50 PSI (tube pressure) bump stop. This tire- and rim-saving feature is unique to pneumatic internal beadlock. Rock Bouncers and racers of all sorts take advantage of this key feature.
Since internal beadlocks only add the weight of the internal mini-tire and inner tube, they weigh far less than conventional beadlocks. Coyotes typically add less than 7 pounds versus the 20 pounds or more for beadlock rims. Bye, bye to excess unsprung weight.
NO BALANCE ISSUES: Coyote beadlock weight is evenly distributed. They do not have balance issues. This is assured by an installation practice. The tread overlap (heavy spot) in the case is positioned opposite the two, 6 to 8 inch spaced valve stems. They counter-balance each other.
DOT COMPLIANT: According to a California Highway Patrol Public Affairs officer contacted for the original internal beadlock article, the US DOT looks at the internal beadlock as an inner tube. However, street legality may vary from state to state and country to country.
NO BOLT CIRCLE TORQUE MAINTENANCE ISSUES: Conventional beadlock lock rings may require torque maintenance for two reasons. One has to do with losing individual bolts and the other has to do with air leaks. Since an internal beadlock does not have a lock ring, there are no bolt-circle torque maintenance issues. You should, however, occasionally check the inner tube pressure.
“LIMP FLAT” CAPABLE: Coyote Enterprises LLC does not claim that its beadlocks are “run flats”. Coyote qualifies this roll while you are flat feature as a “limp flat” capability. With a flat and the Coyote beadlock still inflated, you can slowly pull to the side of the road or trail for a more desirable place to change to your spare. “Limp flat” … some racers have told me that they “limped” 30 miles into the pits at up to 100 MPH.
FASTER AIR UP/DOWN TIMES: This picture tells the internal beadlock air up/down story. The internal beadlock occupies space that is not involved with airing up or down. Depending on tire size, this advantage can be anywhere from 20% to 50% of the total tire volume. Want to cut the time you spend at the valve stems? Use internals.

COYOTES IMPROVEMENTS: With better than 17 years under my beadlock belt, improvements went begging on all designs. I listened and redesigned the Staun.
IMPROVING INTERNAL BEADLOCK DESIGN: Inner tube failures and air channel problems have plagued every internal beadlock manufacturer since inception. These were killing Staun sales. I spent two years from the collapse of Staun Products in 2010 to 2012 improving the otherwise good concept. This involved many material and manufacturing changes, some obvious, some not so obvious and some not offered for proprietary reasons.
STAUN’S MINI-TIRE TREAD STRENGTH: Back off for a minute and let’s consider mini-tire strength. Staun specified a maximum tube pressure of 48 PSI. At whatever pressure you specify (run), the mini-tire should maintain its shape and size, and not deform. Stauns deformed.
STAUN MINI-TIRE STRETCH: The internal, mini-tire does not hold air. Its job is to profile the inner tube so it leaves air down space above it and maintains pressure against the inside of the tire beads. A special inner tube within holds the air. Staun tube failure appeared during both installation and trail use. Cure that and I’d have gobs of happy campers.
Sparing you the excruciatingly fine details, I discovered that the Staun mini-tire tread stretched and drug the sidewalls and beads up. This allowed the tube to escape and rupture. It also exposed the tube to the sharp tire bead, tube-cutting edges … all undesirable. This shows the enlarged Staun mini-tire gap. Stronger tread material was the key to solving the tube problem, but what does that do?

 There are lots of mini-tire tread square inches. Couple that with 48 PSI and you see a massive amount of force. The Staun (orange) tread area was 616 square inches. 48 (PSI) X 616 (square inches) = 29,568 pounds of beadlock case-stretching force. That’s like six 4Xs trying to tear things apart.
Staun’s tread material’s total strength was 1,000 pounds per inch of width strong or 6,000 pounds total. And for the techie guys out there please cut me some slack on this next approximation. For everyone, techies included, you’ll get the idea despite the smoke and mirrors. Pit Staun’s 6,000 pound strong tread against six 4Xs and guess who loses?
As the pressure on the Staun mini-tire increases, the tread diameter and circumference grows making even more area, but I neglect that in my calculations. For a mounted internal beadlock, you do not get to see this growth. That’s happening inside the mounted tire, so you blindly continue to force air into the out-of-sight, ever fattening mini-tire! With my “peek-a-boo” tire, I could see that the Staun stretched 6 inches or more in circumference! That stretch was heretofore unknown … grossly unacceptable. Something had to be done.

I chose a 9-times-stronger tread material for the Coyote beadlock case. For internal beadlocks, the tread strength is critical! The paragraph below shows that this stronger tread material passed the tread-stretch test with flying colors.
ULTRA4 TIRE SPECIFICATIONS: The ULTRA4 (Ultra 4-Wheel Drive Racing) spec says that the maximum OD for anything inside the tire, be it inner liner or Coyote beadlock, can only be 28 inches in diameter max. 28 inches is the standard OD for Coyote’s 15, 16 and 17 inch beadlocks. Using our standard 6 inch wide tread webbing, we end up with 528 square inches of tread surface. The Coyote’s X9 stronger tread is 6 (inches wide) X 9,000 (pounds per inch of width) = 54,000 pounds strong! That’s well in excess of the expansion force of 528 (square inches) X 50 (PSI) = 26,400 pounds of force against the tread. Coyotes win that arm wrestling match.
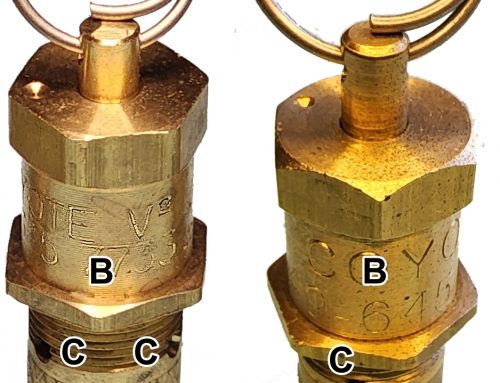
STAUN MINI-TIRE SIDEWALL STRENGTH: Staun’s sidewall material was 20 ounce upholstery PVC. I could see that it also stretched, so I chose the strongest material available. That’s an “industrial strength”, 40 ounce, black only PVC. Black sidewalls along with our yellow tread are signs that you are looking at a Coyote beadlock.
BUMP STOP STRENGTH: High mini-tire (tube) pressure results in the Coyote beadlock’s most powerful feature – a tire- and rim-saving, 3-inch high, 50 PSI, protective bump stop. Coyote upped the tube pressure to just a little less than the new burst test pressure of 105 PSI. The bump stop protection is independent of the tire pressure. Let’s put some numbers on the Coyote bump stop strength.
Please bear with me. We have to first put numbers on the “elements” so we can calculate just what’s going on bump stop protection-wise.

Let’s say you’re zooming along at 50 MPH in the open desert between Sledge Hammer and After Shock in Lucerne Valley, CA. King of the Hammers racers clip along parts of this same area at 110+ MPH. You’re Coyote-equipped tires are at 10 PSI and you hit a buried rock, hard! Let’s assume that this rock is 6 inches square. That’s 36 square inches. The 10 PSI in the tire offers 36 X 10 or 360 pounds of initial protection. A measly 360 pounds of resistance does next to nothing. That means you immediately crush down on the Coyote’s bump stop.
The 50 PSI Coyote when first contacted offers another 1,800 pounds of protection against further compression. Remember that as the tire and Coyote mini-tire compress, the volume decreases and the resistance pressure goes up offering even more protection. However, I don’t consider this in either the tire or beadlock calculations. Simply calculated the resistance totals 2,160 pounds of tire and rim protection. Did it save anything? I don’t know … Did it break anything? I don’t know … but it certainly offers a conservative ton plus of wheel-protecting peace of mind.
INNER TUBE FEATURES: The second element to improving the Stauns was ensuring inner tube survival. You saw above how we reduced tube vulnerability by strengthening the mini-tire, but what about the tube itself? Let’s start with the valve stem and then move on to other aspects that improve tube endurance.
INNER TUBE VALVE STEM: This begins with understanding that you are putting the internal beadlock in a tubeless tire … wheel. Everything you do with and about the internal beadlock has to be “tubelessness” compatible. The tube valve stem is part of that. It has to seal the rim hole. A conventional car tube stem does not do that. They have slots at the base allowing the air trapped between the outside of the tube and the inside of the tire to escape. Otherwise, this may slowly leak out and change the tube and effective tire pressure.

The problem is that no internal beadlock-sized tubes are made with all-thread valve stems. Motorcycle and bicycle tubes have ’em, but most other tubes, no. Coyote inner tubes are special made with factory vulcanized all-thread valve stems.
However, for prototyping I use a cost reducing patch-on approach. That both speeds up prototyping and costs less. Got a special beadlock size in mind?
INNER TUBE SIZE AND STRENGTH: Do you remember as a kid blowing up a balloon so much that the thin rubber felt tight as a drum? How about when you just put enough air in it to hold shape? The tight guy was rupture-vulnerable but the soft guy seemed indestructible! Same goes for inner tubes. If you stretch them, the rubber gets thinner, stiffer and weaker. At the “just hold shape” point, the un-stretched rubber is still at its softest, thickest and strongest. Coyote tubes are sized to just fill the mini-tire and the rim’s drop center.
Since we have the tubes custom made, we also specify that the manufacturer make them with their thickest material. This results in our “HD” rating.

AIR CHANNEL DESIGN EVOLUTION: Since Olle introduced the internal, pneumatic beadlock to the world in around 1990, let’s scrutinize his air channel design. It was a custom molded, firm rubber piece that used an all-thread valve stem (unseen, opposite side).
It met one of two critical air channel criteria. It had well-supported air paths, but the thick, stiff rubber did not contour well to the tight curves of rim drop centers.

AUSTRALIAN RACER APPROACH: An Australian off road racer used TireLocs, but TireLoc’s stiff air channel created tube problems. The Aussie solution had two web walls and a flexible floor. A special valve stem sat in between the walls and on the floor. The air would find its way to the wall-floor intersection and move along the blue lines out to the tire’s main air chamber. Over time, these triangular channels eventually collapsed. The only way you could air down was to deflate the beadlock tube, air down, then reinflate the beadlock and finally jockey the interacting pressures back and forth until you got both to what you wanted … a big pain in your seat cushion attachment.
STAUN’S APPROACH: Staun entered the market with one air channel design and that was followed by at least a change per year until it went broke. Each temporarily solved one of the two problems, but none ever solved both problems perfectly. For example, one flexed and contoured to the drop center, but over time, the air path kept collapsing and collapsing until it no longer passed air. Another allowed air to always pass, but sometimes the tube would make its way under the stiff support and blow.

COYOTE APPROACH: I imported the Stauns for five years and suffered with air channel change after change and failure after failure. That was very embarrassing for this performance, results-oriented guy. What I learned was that the air path need not be terribly large, but it must withstand the tube’s never ending 50 PSI collapsing force. The perfect, flexible channel (snorkel) had to stay open regardless of shape. Given all of that, the air channel also had to conform to a shape drop centers. What I needed was a stiff, segmented, solid strip of something that would accept a standard valve stem. And if the design wasn’t patented, I’d feel like I was giving away the store revealing the following details.
Having come up with one solution, I had an “aha moment” that solved the problem perfectly. How would large zipper teeth, spaced apart and sewn to a piece of flexible PVC hold up against the 50 PSI bully? The blue line is the sturdy, flexible answer. But there is more to it than that.
This picture shows our past, almost perfect valve stem. It has two thread diameters. The larger one accommodates the lock nut and the smaller one is for the valve cap. This conventional design has a big problem. Many alloy rims have small diameter, counter bored holes that only accept rubber valve stems. For metal valve stems either the lock nut doesn’t fit in the hole or there’s no tool clearance for tightening. But wait! There’s more!

This picture shows the current rev A Coyote air channel. It has only one thread diameter discussed below. This test air channel shows how intensely it was pinched between the tire and beadlock beads. Also see how the balance of the air channel contoured as needed. The zipper fulfills both air channel perfectly.

The Coyote valve stem is unique. This special valve stem has only valve cap threads. The shoulder nut reaches down into the small rim hole leaving the hex portion out of for easy tightening access. Also, its collar washer fits down in the bore and protectively nests over the rim air-seal grommet.
Incorporating all of the above … case, tube and undisclosed improvements results in the tough, abuse-tolerant, internal Coyote beadlock. Here are the results of what some competitors have experienced.

KOH RACER SARA PRICE: When addressing Coyote beadlock durability by email, I sometimes include this as an attachment. Sara got a rock in the sidewall just 100 yards off her qual-lap start. She ran the 4.3 mile, 2017, KOH qualification lap, finished the lap and qualified in the top 10 out of 40 ATVs. She’s currently driving for Toyota.

ROCK BOUNCER TRAVIS LOVETT: Travis is an East Coast, podium-performing Rock Bouncer. He uses Coyotes in his buggy. He claims that he was going 60  MPH when he hit the tree shown in this grainy video. He finished the race on this wheel. The still-inflated Coyote kept the tire locked to the battered rim to the finish line. What’s that you say, “What tire pressure does he run?” With fully inflated Coyotes, he pulls the tire’s valve cores and runs zero PSI.
If you are not familiar with Rock Bouncers, they make KOH races look like grandma’s trip to the store for a loaf of bread. They brutalize their equipment!

RALLY FOR THE VETS: Gary DeMasi rallies his Ford Ranger for our veterans. He’s one himself. Pre Coyote beadlocks, he popped beads. With the low pressure that gave him the cornering-traction he wanted, he’d pop tire beads. Once installed, Coyotes cured that and he began making podium appearances. This shot shows how he pushes it in the corners. He’s up on two with lateral de-beading forces and no popped beads … plus he maintained control. He fully recovered and kept racing! The position of his front wheels tells you that he knows what he is doing. His tire pressure was in the low twenties, but his Coyotes were at 50 PSI.
Got beadlock questions? Shoot me an email.
Read the next FOURWHEELING ACADEMY article titled When Will I Roll about the center of gravity. It explains what keeps the rubber side down and the shiny part up.