ADJUSTING COYOTE V2 VORTEX DEFLATORS
FOR COYOTE VORTEX V2 DEFLATORS ONLY
THIS PAGE RELATES ONLY TO NEW STYLE COYOTE VORTEX V2 DEFLATORS. OLDER LEGACY DEFLATORS HAVE DIFFERENT SPECIFICATIONS, ASSEMBLY AND MAINTENANCE INSTRUCTIONS, LOCATED HERE. IF YOU ARE UNSURE WHICH COYOTE DEFLATOR YOU OWN, READ THIS ARTICLE.
The Coyote Vortex Venting, deflators offer quicker air downs and with O-ring assisted setting technology, they are easier to adjust. That means anyone can set our XCEDV2 and CEDV2 deflators regardless of their mechanical competence or confidence. We support that with on the spot, cell phone support.
I’m (Harry) and I’m just a cell call away, (949 645-7733, weekdays, PT) right in front of your tire, when you need adjustment help. Use our number that is imprinted on each deflator. We want happy customers. That starts with practicing these words of CAUTION.
CAUTION:
- Low tire pressure makes for unfamiliar vehicle behavior. Drive with increased handling awareness.
- Always have a way to reinflate your tires back up to the pressure recommended by your vehicle or tire manufacturer.
- Compressed air (all gases) presents hazards. Always use protective eyewear when setting or using Coyote Tire Deflators.
- Never completely remove the Adjustment Cap from the deflator Body while screwed on a pressurized valve stem. This will shoot parts out of the Body and may result in serious injury including blindness and death.
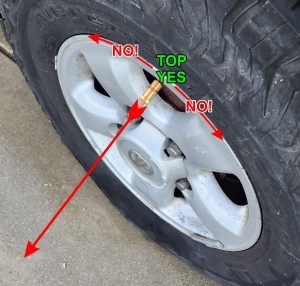 IMPORTANT SETUP DETAILS: The V2s can be adjusted on most TPMS vehicle’s pressurized tires. However, for safety and practicality (lost parts), this process requires that you always: 1) Position the valve stem at the top, 12 o’clock wheel position, pointed down, as shown. 2) Make only one revolution of the Adjustment Cap at a time and then measure the pressure. 3) Never adjust below 8 PSI while on a pressurized valve stem. This ensures that the Cap will stay attached to the Body. If the Cap is completely unscrewed (counter clockwise) off of the Body, internal parts will shoot dangerously out of the Body and may cause personal injury and/or lost part. Lost parts are not covered by the warranty.
Pointing down aims the deflator and all parts within, down. Pointed other than down presents potential hazards to you and others. The area in and around the red line must be kept clear of yourself, others and pets. Also, this is where you look for parts if you completely remove the Cap.
BACKGROUND: With the advent of TPMS dashboard, digital, tire pressure display comes a faster, easier way to set Coyote V2 deflators. However, you must follow the CAUTIONS and details presented throughout these guidelines. TPMS and the patented, O-ring enhanced setting technology reduces the number of repetitive steps of the past. Here’s a setting overview.
OVERVIEW: Your TPMS must be capable of digitally displaying tire pressure when parked. Other or non TPMS vehicles must revert to the original adjustment method as described here, https://coyoteents.com/manual/
Adjusting Coyote V2 deflators is a repetitive set and measure process with two preparatory actions. First, measure each deflator’s factory setting. Secondly, if you want to set to a pressure higher than 18 PSI, first, increase the deflator set pressure by turning the adjustment cap down, clockwise, and increase the tire pressure tire pressure above your set pressure. Now, install and start the deflator. After it stops, read the pressure on the dash. Finally, when you reach your set pressure, secure the Lock Nut up against the Cap. Repeat this for the remaining deflators.
SETTING DETAILS: This applies to digital tire pressure TPMS display equipped vehicles.
The deflators are factory, functionally tested. The resulting pressure is typically in the range of 10 to 20 PSI hence the need to start with checking each deflator’s set pressure.
- Measure the factory pressure by removing the valve stem cap, giving the core a brief push to clear any dirt, installing the deflator and gently pulling and releasing (after air flow starts) the Manual Start Ring. Read the dash pressure after it stops. Obviously, when it’s at the pressure that you want, move on to the next deflator.
If your set pressure is lower than measured, loosen the Lock Nut clockwise, down, away from the Cap, unscrew (CCW) the Cap another turn (or less as needed) and move to step 3. - If your set pressure is higher, you must first inflate the tire to 6 or 8 PSI above your target pressure and increase the factory setting. Do this by loosening the Lock Nut clockwise, down and away from the Cap. Now tighten the Adjustment Cap (clockwise, down, in the same direction) about one turn for each 5 or 6 PSI of desired target pressure increase. Reinstall the deflator and move to the next step.
- With either the tested or readjusted deflator on the valve stem, manually start deflation by pulling the Ring and letting go as before. Again, read the dash pressure. If your target pressure is still higher, unscrew (CCW) the Cap another turn or less, start deflation and reread the dash pressure. Repeat this process until you achieve your destination pressure.
- Keeping the Adjustment Cap firmly in position on the Body, secure the Lock Nut up (CCW) against the Cap.
- Repeat these steps for each deflator.
SETTING ASSISTANCE: As already mentioned, on the spot, cell phone support is available. I’m just a cell call away at 949 645-7733, weekdays, 10AM to 5PM PT. The number is stamped on each deflator. And under all circumstances always practice the words of CAUTION.
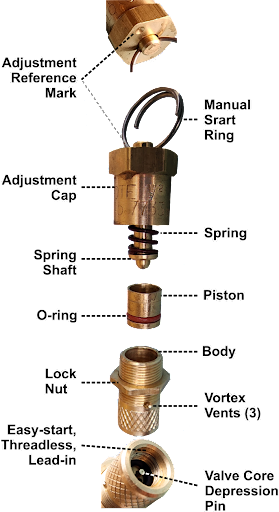
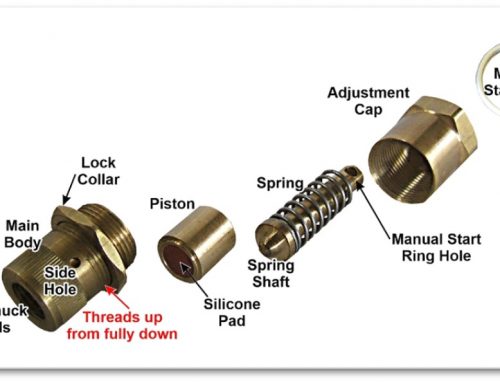
DEFLATOR PARTS: To ensure that we are on the same page, here’s what you need to know about the parts.
This mark makes precise adjustment a breeze.
The ring makes bringing that mid-day (temperature) pressure increase back down to your cold morning air down pressure a cinch. It is also used to set your deflators.
Pressure adjustment is achieved by turning the Adjustment Cap.
Spring force is what you are adjusting.
The patented Spring Shaft tip centers the force in the Piston for a symmetrical pressure seal at any pressure.
Piston movement turns the deflator ON and OFF. The O-ring makes it easy to adjust.
The Body keeps things together.
The Lock Nut locks in your adjustment.
Three Vortex Vents speed deflation.
Easy Start threadless lead-in ensures effortless installation every time.
The Valve Core Depression Pin opens the valve stem for deflation.