COYOTE LEGACY DEFLATOR Setting details
FOR COYOTE LEGACY DEFLATORS ONLY
THIS ARTICLE CONTAINS INFORMATION ABOUT COYOTE LEGACY DEFLATORS. LEGACY DEFLATORS HAVE DIFFERENT SPECIFICATIONS, ASSEMBLY AND MAINTENANCE INSTRUCTIONS FROM THE NEWER COYOTE VORTEX V2 DEFLATORS. IF YOU ARE UNSURE ABOUT WHICH COYOTE DEFLATOR YOU OWN, READ THIS ARTICLE BEFORE ATTEMPTING TO ADJUST OR MAINTAIN YOUR COYOTE DEFLATOR.
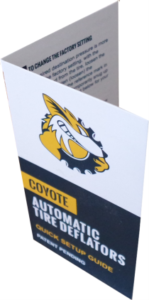
With each set of Coyote deflators comes this business card sized QUICK SETUP GUIDE. It condenses the details that follow and neatly fits in the storage pouch. It’s an ever-present trail setting companion.
CAUTION: Low tire pressure makes for unfamiliar vehicle handling. Never deflate your tires unless you have a way to reinflate them to the pressure recommended by your vehicle or tire manufacture for highway use. Compressed air (all gases) presents several hazards. Always use protective eyewear when setting or using your Coyote Automatic Tire Deflators. Never completely remove the Adjustment Cap from the deflator Body while screwed on an inflated tire or any pressurized vessel of any sort. This will shoot parts out of the deflator Body and may result in serious injury, blindness or death.
Coyote Enterprises LLC (CE) is not liable for any special, indirect, incidental, consequential damage or personal loss, injury, blindness or death which may result from the use or misuse of the Coyote Automatic Tire Deflators or when driving with your tire pressure lower than the pressure recommended by your vehicle or tire manufacture for highway use. This warranty gives you specific rights which may vary from state to state or country to country.
This 1, 2, 3, trial and error, paint by numbers approach to setting your deflators makes adjusting a breeze (pun intended!). However, the repetitious nature of the process does require patience. See HINTS, below to ease and speed the process.
TOOLS – DO NOT USE PINCHING TOOLS like pliers, vice grips or channel locks. These crush Body and void the Warranty.
Open end, box or crescent wrenches are acceptable for the 5/8” Lock Collar and 9/16” Adjustment Cap
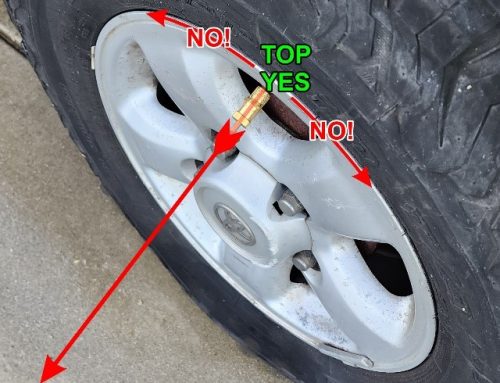
![]() INSTALL SET DEFLATOR – Remove the valve cap, install a set deflator, pull the Manual Start Ring if needed and wait for exhausting air to stop, shut OFF.
INSTALL SET DEFLATOR – Remove the valve cap, install a set deflator, pull the Manual Start Ring if needed and wait for exhausting air to stop, shut OFF.
Always use valve caps! Uncapped valve stems collect dirt that, when passing through a deflator, may cause deflator malfunction or damage. This misuse is not covered by the Warranty. See “cleaning Coyote automatic tire deflators” .
![]() REMOVE AND MEASURE DEFLATED TIRE PRESSURE– Remove the deflator from the valve stem and measure the tire pressure with the tire pressure gauge you’ll use on the trail, or read the TPMS pressure on your dash. If the pressure is what you want, skip to step
REMOVE AND MEASURE DEFLATED TIRE PRESSURE– Remove the deflator from the valve stem and measure the tire pressure with the tire pressure gauge you’ll use on the trail, or read the TPMS pressure on your dash. If the pressure is what you want, skip to step ![]() . To increase the pressure, go to the next step,
. To increase the pressure, go to the next step, ![]() . To decrease the pressure, skip to step
. To decrease the pressure, skip to step ![]() .
.
Measuring tire pressure, in many respects, is far more complex than some think. Learn how gauges work here. Learn how elevation affects your gauge reading here. Learn how temperature affects tire pressure here.
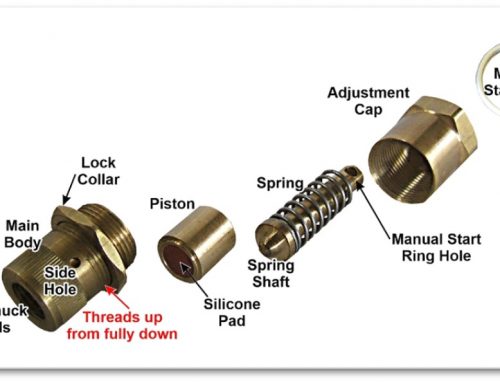
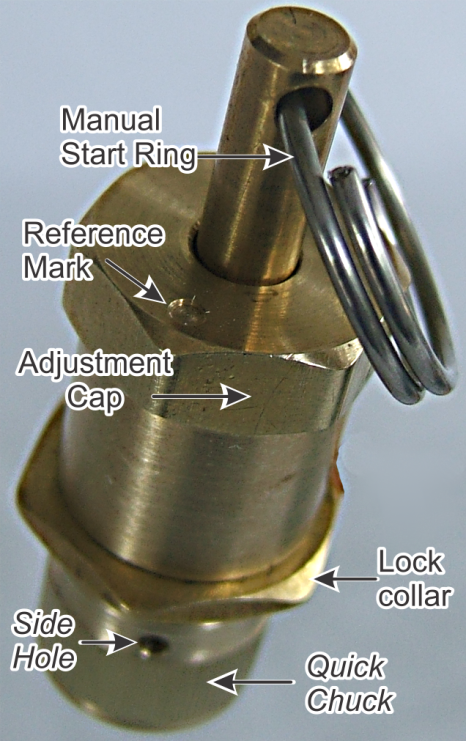
![]() TO INCREASE DEFLATOR DESTINATION PRESSURE* – Loosen and turn the Lock Collar several turns down, clockwise (CW), toward the deflator’s valve stem end. Take care not to turn the Adjustment Cap.
TO INCREASE DEFLATOR DESTINATION PRESSURE* – Loosen and turn the Lock Collar several turns down, clockwise (CW), toward the deflator’s valve stem end. Take care not to turn the Adjustment Cap.
Using the Reference Mark on the top of the Adjustment Cap, now turn the cap clockwise (CW) one quarter turn to increase the pressure by about one pound for the silver springs. For the red spring, one quarter turn CW increases the pressure by about two pounds. Whatever color spring is NOT in your storage pouch is what is installed in the deflator. Skip to step ![]() .
.
Want to go higher than the silver springs can? Learn how to change springs here.
![]() TO DECREASE DEFLATOR DESTINATION PRESSURE* – CAUTION – never adjust the deflator or completely unscrew the Adjustment Cap off of the Body while screwed on a tire valve stem or other pressurized vessel.
TO DECREASE DEFLATOR DESTINATION PRESSURE* – CAUTION – never adjust the deflator or completely unscrew the Adjustment Cap off of the Body while screwed on a tire valve stem or other pressurized vessel.
Loosen and turn the Lock Collar several turns down, clockwise (CW), toward the deflator’s valve stem end. Take care not to turn the Adjustment Cap.
Using the Reference Mark on the top of the Adjustment Cap, now turn the cap counterclockwise (CCW) one quarter turn to decrease the pressure by about one pound for the silver spring. For the red spring, one quarter turn CCW decreases the pressure by about two pounds. Whatever color spring is NOT in your storage pouch is what is installed in the deflator.
![]() REINFLATE, REINSTALL, DEFLATE AND REMEASURE – In essence, repeat steps
REINFLATE, REINSTALL, DEFLATE AND REMEASURE – In essence, repeat steps ![]() and
and ![]() as many times as needed to reach your desired Destination Pressure*.
as many times as needed to reach your desired Destination Pressure*.
![]() TIGHTEN LOCK COLLAR AND CONFIRM YOUR DESTINATION PRESSURE – Tighten the Lock Collar securely counterclockwise (CCW) up against the stationary Adjustment Cap. Now, repeat step
TIGHTEN LOCK COLLAR AND CONFIRM YOUR DESTINATION PRESSURE – Tighten the Lock Collar securely counterclockwise (CCW) up against the stationary Adjustment Cap. Now, repeat step ![]() to ensure that you measure the same pressure at least two times in a row. This allows for the “settling in” process and ensures that the deflator has “settled in” to its final Destination Pressure*. I’m disappointed that it happens, but cumulative tolerances and the varying deflator components’ nesting positions requires that we perform the “settling in” step.
to ensure that you measure the same pressure at least two times in a row. This allows for the “settling in” process and ensures that the deflator has “settled in” to its final Destination Pressure*. I’m disappointed that it happens, but cumulative tolerances and the varying deflator components’ nesting positions requires that we perform the “settling in” step.
Make it easy on yourself. Plus, or minus a pound is totally acceptable. Learn how the sunny side tire pressure varies (changes) greatly from the shady side tires. Read the section about sunny and shady tires here.
NEVER SET, ADJUST OR DISASSEMBLE A DEFLATOR WHILE INSTALLED ON A TIRE VALVE OR STEM ON ANY PRESSURIZED TIRE OR VESSEL.
HINTS
A) Make adjustments easier and faster by reinflating the tire just 3 or 4 PSI above your desired Destination Pressure.
B) Make sure that the Lock Collar is loosened down (CW), toward the valve stem end of the deflator and out of the way of the Adjustment Cap.
C) Consider using a smaller hand truck or wheelbarrow tires to speed-up the setting process. But, if you have TPMS, the setting will most likely differ due to the valve stem air flow rate differences. Your choice is to either not use the smaller, faster tire or compensate. If the TPMS result is two PSI lower (16 PSI for example) than the small tire setting (18 PSI), simply raise the setting by the difference (2 PSI) to 20 PSI.
D) Tighten the deflator onto the valve stem “securely”. This ensures maximum deflator air flow. Achieve “securely” by screwing the deflator down until you feel the O-ring engage. Now, give it a quarter to half a turn more and you are secure.
If you are having setting, adjustment or use problems, we sincerely welcome your email – Harry@CoyoteEnts.com or call (949) 645-7733. I’m more than happy to walk you through the learning process.
| ALL | SPRING COLOR |
DESTINATION PRESSURE |
PSI CHANGE PER TURN |
| COYOTE | SILVER | 1 TO 20 PSI | 4 PSI ± 1 PSI |
| DEFLATORS | RED | 8 TO 65 PSI | 7 PSI ± 1 PSI |
WARRANTY: The Coyote Enterprises LLC (CE) Automatic Tire Deflators have a lifetime warranty that covers flaws in material and workmanship for the original purchaser. Proof of original purchase is required. This excludes: 1) misuse, 2) abuse, 3) lost parts, 4) use of pinching tools to tighten the Lock Collar to the Adjustment Cap, 5) lack of maintenance, and 6) corrosion. Corrosion is a function of the environment, so ensure that your deflators are stored in a dry, contamination-free environment. CE will repair or replace faulty deflators, at its discretion, provided the faulty deflators are returned to CE at the owner’s expense. Call first for a Return Material Authorization number. Return to the customer is covered by CE.
Coyote Enterprises is not liable for any special, indirect, incidental, consequential damage or loss, injury or death which may result from the use or misuse of the Coyote Automatic Tire Deflators or when driving with your tire pressure lower than the pressure recommended by your vehicle or tire manufacture for highway use. This warranty gives you specific rights which may vary from state to state or country to country.

QUICK SET INSTRUCTIONS
With each set of Coyote deflators, you get this business card sized Quick Set Guide. It contains a condensed version of the instructions that follow. It neatly fits in the storage pouch for future reference. 
CAUTION: Low tire pressure makes for unfamiliar vehicle handling. Never deflate your tires unless you have a way to reinflate them to the pressure recommended by your vehicle or tire manufacture for highway use. Compressed air (gas) presents several hazards, so always use protective eyewear when setting or using your Coyote Automatic Tire Deflators. Never completely remove the Adjustment Cap from the deflator Main Body while screwed on an inflated tire or other pressure vessel of any sort. This will shoot parts out of the deflator Main Body and may result in serious injury, blindness or death.
Coyote Enterprises is not liable for any special, indirect, incidental, consequential damage or loss, injury or death which may result from the use or misuse of the Coyote Automatic Tire Deflators or when driving with your tire pressure lower than the pressure recommended by your vehicle or tire manufacture for highway use. This warranty gives you specific rights which may vary from state to state or country to country.
![]()
 MEASURE THE FACTORY SETTING – Screw a factory set deflator on a tire valve stem, pull the Manual Start Ring if needed, wait for it to shut OFF, and then remove and measure the destination pressure with your air down gauge.
![]() TO CHANGE THE FACTORY SETTING – If your desired destination pressure is more (less) than the factory setting, loosen the Lock Collar and loosen (tighten) the Adjustment Cap as needed. For the factory installed silver springs, the adjustment rate is 4 PSI per revolution of the Adjustment Cap. The chart below gives both the silver (installed) and red (optional) springs’ adjustment rates. Use the Reference Mark in the top for orientation to keep track of your change. Clockwise, down (counterclockwise, up) increases (lowers) the destination pressure.
TO CHANGE THE FACTORY SETTING – If your desired destination pressure is more (less) than the factory setting, loosen the Lock Collar and loosen (tighten) the Adjustment Cap as needed. For the factory installed silver springs, the adjustment rate is 4 PSI per revolution of the Adjustment Cap. The chart below gives both the silver (installed) and red (optional) springs’ adjustment rates. Use the Reference Mark in the top for orientation to keep track of your change. Clockwise, down (counterclockwise, up) increases (lowers) the destination pressure.
![]() CHECK THE SETTING – Increase the tire pressure by 3 or 4 PSI above the desired setting, screw the deflator back on the reinflated tire, then gently pull and release the Manual Start Ring. After the deflator stops exhausting air, remove the deflator and measure the new destination pressure. As needed, repeat this process (steps 2 and 3) until your destination pressure is achieved. Finally, securely tighten the Lock Collar against the stationary Adjustment Cap. Do not use pinching tools on either the Adjustment Cap or Lock Collar. This voids the Warranty. Only use open end, box or adjustable wrenches to lock in your setting.
CHECK THE SETTING – Increase the tire pressure by 3 or 4 PSI above the desired setting, screw the deflator back on the reinflated tire, then gently pull and release the Manual Start Ring. After the deflator stops exhausting air, remove the deflator and measure the new destination pressure. As needed, repeat this process (steps 2 and 3) until your destination pressure is achieved. Finally, securely tighten the Lock Collar against the stationary Adjustment Cap. Do not use pinching tools on either the Adjustment Cap or Lock Collar. This voids the Warranty. Only use open end, box or adjustable wrenches to lock in your setting.
HINTS
A) Make adjusts easier and faster by just reinflating the tire to 3 or 4 PSI above your desired setting. Then, screw the reset deflator back on the stem. This securely holds the deflator in place for moving the Adjustment Cap.
B) Hold the pull ring to prevent it from turning while moving the Adjustment Cap.
C) Make sure that the Lock Collar is loosened down and out of the way of the Adjustment Cap.
D) Repeat A, B and C until your desired destination pressure is achieved.
E) Consider using smaller hand truck or wheelbarrow tires to speed up the setting process.
| All COYOTE DEFLATORS | |
| SPRING COLOR |
SILVER |
| DESTINATION PRESSURE |
1 TO 20 PSI |
| PSI CHANGE PER TURN |
4 PSI ± 1 PSI |
| SPRING COLOR |
RED |
| DESTINATION PRESSURE |
8 TO 65 PSI |
| PSI CHANGE PER TURN |
7 PSI ± 1 PSI |
WARRANTY: The Coyote Enterprises LLC (CE) Automatic Tire Deflators have a lifetime warranty that covers flaws in material and workmanship for the original purchaser. Proof of original purchase is required. This excludes: 1) misuse, 2) abuse, 3) lost parts, 4) use of pinching tools to tighten the Lock Collar to the Adjustment Cap, 5) lack of maintenance, and 6) corrosion. Corrosion is a function of the environment, so ensure that your deflators are stored in a dry, contamination-free environment. CE will repair or replace faulty deflators, at its discretion, provided the faulty deflators are returned to CE at the owner’s expense. Call first for a Return Material Authorization number. Return to the customer is covered by CE.Coyote Enterprises is not liable for any special, indirect, incidental, consequential damage or loss, injury or death which may result from the use or misuse of the Coyote Automatic Tire Deflators or when driving with your tire pressure lower than the pressure recommended by your vehicle or tire manufacture for highway use. This warranty gives you specific rights which may vary from state to state or country to country.