COYOTE BEADLOCK AIR CHANNEL MOUNTING DETAILS
BLIN-10 Rev05
Problem: The Air Channel (AC) does not air down the tire without first deflating the beadlock inner tube.
Background: Most likely, the BL case outside Bead was mis-installed. The red lines in Fig. 1 shows how the BL case Bead is improperly placed directly on the metal of the rim’s drop center leaving a gap gap below the AC envelope.
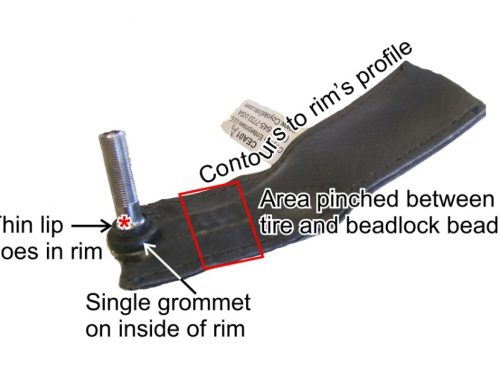
Fig. 1

Fig. 2

This leads to the Bead struggling to move up and on top of the AC envelope in the direction of the red arrows (Fig. 2). This tears the leading edge of the envelope and exposes the metal end of the AC. The high-pressure inner tube seals off the exposed metal valve stem opening and prevents airing down.
Solution: Here’s how a successful Air Channel installation starts. Put the beadlock case Bead up and on the AC envelope about ½ to 1 inch. This prevents the Bead from otherwise struggling up from the rim drop center and tearing the valve stem end of the AC.
A conventional Raceline mechanical beadlock rim offers a “backward” look at Fig. 3. It shows the BL Bead (1) up and on the AC envelope (3). 2 is the BL case Sidewall and 4 is a peek at the inner tube (red arrow). Note how the BL Bead is up and on the AC envelope. It is not on the tube or down in the drop center. The metal valve stem is barely visible bottom, center (unnumbered).
Fig. 3

Use this suggestion sparingly! Oil is the enemy of a seated BL Bead. Conservatively lubricate the AC envelope just above the Bead with an oil-dampened Q-Tip. This helps the Bead freely move to its proper position as the beadlock is inflated. Avoid putting oil on the Bead or any other part of the BL or rim. Only oil the AC envelope.
Fig. 4

As Mickey Mouse as this sounds, it works. It provides a smoother path for Bead movement onto the AC. It also keeps the AC in place during other installation steps. First, put a piece of your best duct tape from the drop center up and onto a properly aligned AC envelope. Secondly, move the Bead up and onto the tape about 1 inch.
Fig. 5

Our Installation Manual shows it this way:


View our installation video here.
I want every Coyote beadlock owner to experience the full performance capabilities of our products. I’m always available to answer your questions and encourage your calls (949 645-7733) and emails Harry@coyoteents.com. Let us know what’s going on!